Friday, 25 July 2014

Just Stain It at A Vintage Journey

Wow another trip finished and time to start the next leg of the journey and Jenny is challenging us to Stain It. her brief is – ‘Distress Stains are the best way of getting your favourite Distress Ink colours in liquid form. That makes them ideal for staining flat surfaces/edges and crackled surfaces, painting, dripping, splatting, and so much more. Show us what you can do with your Distress Stains’.

I love the versatility of the distress stains and had fun making another masterboard background for this project and it's the second journal cover from me this week.
P1170701
This is a sketchbook journal, you know the ones you can buy for around £2.99 in The Works or The Range.
P1170644
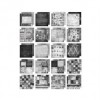
I covered a long piece of greyboard with gesso and when dry I rubbed over the distress stains, wiping them away and blending them with a wet babywipe. This gave me a light coloured base on which to do the next step.
P1170573
The wrinkle free technique. I sprayed water, dipped and dried several layers until I was happy with the overall effects.
P1170610
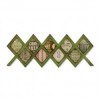
I had covered a spare piece of greyboard with the gesso and mopped up the inks left on my mat before die-cutting the Artful Arrows. I dipped these in walnut stain and gathered twigs distress stains and dried them before adding a layer of clear distress crackle paint.
P1170577
P1170602
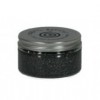
Whilst the arrows were drying I added some crackle paste through Tim's chevron and arrows layering stencils and heat dried it, which produced some crackles but I had kept it quite thin so they don’t show up as much as I thought they would.
P1170619
Once the crackle paint was dry on the arrows I dabbed some distress stains in a few areas and wiped them off again bringing some colour back into them.
P1170642
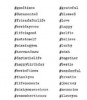
I added a few pieces of tissue tape and the arrows then splattered, sprayed with water and dripped stains onto the board until I was happy with the result. I finished off with die-cut letters for my saying, a spray of sealer and a chit chat sticker under the filmstrip.
P1170634
Thanks Jenny for the challenge and I have only used distress stains for all the colouring. I think the bit I like most are the arrows with the shattered stains effects on them.
P1170632
I hope you will have time to join us at A Vintage Journey before the challenge finishes and please pop over to see the amazing projects designed and created by the talented Creative Guides, there is just so much inspiration to see.
P1170696
Have a happy Friday, a wonderful weekend and some creative fun.

hugs Brenda xxx

Tuesday, 22 July 2014

Journal cover using a masterboard.

Today it’s my turn to present a piece of work for the Country View Project Blog.

Do you remember the masterboard I made for the challenge blog at the beginning of the month? Well I decided to use part of it to make a cover for a small journal. You can see the full tutorial of how to make the board HERE.

Here are a couple of sneak peeks of the journal cover.

P1170403

P1170404

The fun in making your own covers is knowing that no-one will ever have one exactly the same (even me lol). This one though went to a friend for her birthday.

If you haven’t joined in the challenge yet, perhaps you'd like to get out your stencils and have a go at making a journal or notebook cover for yourself and then show it to us on the challenge blog.

Have fun with whatever you are making this week.

hugs Brenda xxx

Thursday, 17 July 2014

Stencil It (2) for Country View Crafts

My second sample for the Stencil It challenge at CVC is a tag with stencil stamping.
P1170376
It also has some texture and collage elements.
P1170383
It would be great if you have time to pop over to see my post today at Country View Challenges to see further details and to enter the challenge if you haven’t already. There is still plenty of time, so pop over to the Challenge post as well to check out the details.

I hope you are having a creative week.

hugs Brenda xxx

Monday, 14 July 2014

The Chemist – using papers and Frantage

I keep telling myself I have got to use up some of these paper stacks that are sitting on a shelf and never seem to get any smaller. So I challenged myself to make a card using the ‘Laboratorie’ papers by Tim Holtz.
This is what I came up with.


I chose the pieces to cut out including a piece of the lattice framework die and picked up a ruler already cut out from another pack and started to put them together as I was designing the layout. I knew it needed something to provide more interest rather than just edging the elements with ink so I got out the Frantage box and used some aged gold and even more of the aged silver embossing enamels.
P1170881 P1170878 P1170882
The silver embossing enamel did the trick and provided not just the interest I wanted but added to the laboratory feel.
P1170888
Three of the science jar/cylinders edged with silver.
P1170887
And the scientist himself. He fits nicely with the Simon Says Monday Challenge - About A Face, so I'll wander over and enter him there.
P1170886
Lastly a hashtag sentiment and done.

Those of you who follow me on Facebook will know I love it when the Farnborough airshow comes round, the planes fly over my house as we are almost under the flight path and I get so excited when the fast jets are displaying and let out the throttle over the rooftop. Last week all the planes came in and I was able to watch their practice displays from my workroom, the window faces the runway. The trade show starts today and runs till Friday and then next weekend is the public days. I will be going in with the family on Saturday to see the static stands and watch the displays by being directly underneath them. So I shall be watching them all week from my vantage point at the window or in the garden. Here’s a photo of the Airbus 380 coming across my rooftop last week. The open window is my workroom.
10th A380 f
Here's one of the F18 displaying over the garden ……
8th 3 F18
…. and the Vulcan
11th Vulcan 1
I could go on with lots more ……. but I’ll leave you with this quote for today.

When everything seems to be going against you, remember that the airplane takes off against the wind, not with it.
Henry Ford

Have a great week.

hugs Brenda xx


Friday, 11 July 2014

A Kaleidoscope of Butterflies


Did you know that a group of butterflies is called a Kaleidoscope, I think that’s a perfect name for such beautifully coloured creatures.


Annie is our host today for our next trip out at A Vintage Journey she is challenging us to
use dies and distress.
Her brief is – ‘You can make any  type of project, tags, canvas, cards,  altered art, as long as you  include Dies and Distress Paints, Inks, Stains, Embossing Powders and/or Markers. Dies can be distressed , embossed, stamped.........the creativity is yours.’


P1170566

I have chosen to use the distress products and Tim Holtz dies for my inspiration today and this is where vintage meets the journalling style.

P1170489

I stamped with antique linen distress paint to create a resist and when it was dry I rubbed the distress stains over it adding some sprays of water. Then sprayed dylusions inks over the top and again when dry I used distress paint through a TH Honeycomb stencil.

P1170487

P1170486

Using coredinations paper I die-cut the top wings and the body and sanded and inked the butterfly 'frame’ before adding it to the coloured wings which were die-cut from some some left over sprayed paper from another project. 

P1170536

I die-cut the smaller butterflies using left over inked papers and started to glue them in place. I added a computer generated quote …

P1170570

….. and some doodling around the page and the words.

P1170528
And there is my kaleidoscope of coloured butterflies.


Stamp sets – Ultimate Grunge, Papillon, Classics #17


Distress products – Distress paint, Distress Stains, Distress inks


Dylusions ink sprays


Dies – Butterfly Frenzy, Fanciful Flight


I wanted to use my large journal and create a page to demonstrate that we do not have to be purely vintage over at A Vintage Journey. We can make things in a shabby, mixed-media or journalling style as well. So what will you enter this time? I hope we will see you over there sharing all the wonderful talent you have.


Thanks for stopping by today, have a wonderful weekend.


hugs Brenda xx


Wednesday, 9 July 2014

Summer Heat Mixed Media Project

I am really excited to be a guest at The Frilly and Funkie’s Challenge blog where the theme is ‘Summer Heat’.
Sue is the hostess and her brief is -
“July brings with it the heat of the Summer, so for this challenge we want to see those warm colours in your project. Think red, orange, sunshine yellow and as an added twist you need to include a summer bloom somewhere on your project. Have fun!”

WARNING – LONG POST with lots of photos but you do get a tutorial as well.


I really went to town with the hot colours in the Dylusions inks range to create my background and I used a linen textured canvas board so I can display this through the warmer summer months. I started with a layer of gold embossing paste by Wendy Vecchi. I love this not only for the texture it adds but the gold seemed to shine through the layers of ink and gives a gorgeous warm glow to the finished piece.

P1170188_thumb

 I added some white gesso over the top of the embossing paste, but I think if I did this again I would leave this layer out.

P1170189_thumb

Then I got started with the sprays, putting most of the colours on wet for the first layer and letting them run together a bit – you can just see that I spray into a pizza box which helps protect the small area I have to work in.

P1170191_thumb

At this point I really wasn’t sure which way up my board was going to be – blue for the sky or green for the grass?

P1170420_thumb

But I added more layers of inks by spraying and heat drying in various areas and spraying short bursts of colour over another colour to get mottled effects.

P1170422_thumb

To finish I stamped some texture stamps in both distress paint and fresco finish paint.

P1170430_thumb

The shabby bloom was inspired by Paula Cheney and you can see her version HERE.

P1170436_thumb

I used Dylusions sprays rather than distress stains and you can see how I made my version below.

P1170445_thumb


Paula Cheney inspired flower
P1170199

I sprayed really hot colours onto a piece of card and pressed another piece into it, giving me two pieces to use for die-cutting.

P1170200

I used both the tattered florals bigz die as well as the jumbo tattered florals die and chose the size petals I wanted.

P1170202

Using four of each of these three sizes I inked the edges with walnut stain distress ink.

P1170203

I then made a hole in each petal and put the two largest sizes together with a brad and curled each individual petal over with using my awl.

P1170205

Taking the water mister I began spraying each layer and curling the petals upwards and scrunching them as I went along.

P1170206

I then gave it one more spray of water to make sure it was wet through and really squeezed it in my hand until it eventually looked like the photo above. Using a heat gun I carefully dried and unfurled the outer petals to get the sort of flower shape I wanted.

P1170210

Next I took the smallest petals and did the same to them and then glued this little bunch into the centre of the larger flower.

P1170445

Finally I inked some of the edges again with walnut stain again to give the flower a more aged and vintage look. It now measures 12 cms across.


The leaves were made in a very similar way using the Dylusions inks…..

P1170211

…. and the Garden Greens bigz die.

P1170217

When I soaked them with water the ink mixed with it and coloured the reverse side of the leaves.

P1170219

I scrunched them, dried them and inked them as before and added to the board with the flower.

P1170447

It would be lovely to see you over at Frilly and Funkie if you have time, but thanks for stopping by and thanks for getting to the end of a long post. Apologies to Fliss and Shilpa who left me a message when I inadvertently published this post last week. A slip of the finger, but it has it's consequences duh!!!!!!!

Thank you to Linda and the team for asking me to guest today, I have so enjoyed making this journal board and it’s certainly a project I will do again.

Enjoy the rest of the week and have some fun creative time.

hugs Brenda