Monday 31 August 2015

Tim's tags for August

Well the weather was atrocious last week and we ended up with flash flooding with our garage and garden underwater, in fact it was well above my ankles round the back and I had to go and carry Cimmie in from the top garden as he wouldn't come through the flooded lower ground. The weekend hasn't been much better with a wet BBQ yesterday and it's rained most of today too, What's happened to the August weather? But I'm not giving up on summer yet and decided to create two tags for Tim's August collection, one in a vintage style like his the other much brighter and reflecting summer at the seaside. Here we meet Georgia at two stages of her young life.
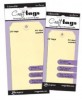


Tag 1
Georgia is 6 years old, she loves the outside especially being at the seaside . My tag is a Tim alternative with a bright summery feel to it but the steps followed are almost the same as the steps Tim teaches us this month.
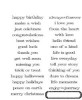

The background colours are mermaid lagoon, twisted citron. broken china, frayed burlap and hickory smoke and I kept to Tim's steps but added my own version of the upper layers. The metal embellishments have been altered using distress paints and archival ink.


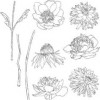
The starfish are the centre of the sand dollar die and cut in hessian to provide texture.


The seahorse was cut from a blue mopup piece of card, painted with rock candy crackle paint and when dry I added peacock feathers and broken china distress stains.


I wonder what else Georgia loves to do apart from be at the beach. Let's find out.


Tag 2
Here Georgia has grown up and at 17 is ready to explore the world, she wants to be an archaeologist and look for historic and beautiful relics. During her childhood she has become very interested in history around the world, has visited museums and archaeological digs and become passionate about saving the world's culture for all to see.


The background colours are barn door, broken china, frayed burlap, hickory smoke and walnut stain and again I have followed Tim's steps keeping to the truer vintage style he has adopted to use this month and adding my own collage.


The embellishing is also different, I've tried to find new ways (for me) to put the idea-ology trinkets together.


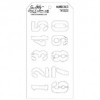
I enjoyed experimenting with the techniques this month, they suit my grungy style ......


... but I also loved playing with ways the techniques could be changed especially using different dies and colours.


I am linking, by the skin of my teeth,  to Tim's August collection and you can see his steps for making the tags on his BLOG.

I hope you've had a good weekend especially those in the UK with the extra day for August Bank Holiday. Have a good week ahead and consider as an artist/crafter are you an architect or a gardener. (I think I am a bit of both).

hugs Brenda xxx


“I think there are two types of writers, the architects and the gardeners. The architects plan everything ahead of time, like an architect building a house. They know how many rooms are going to be in the house, what kind of roof they're going to have, where the wires are going to run, what kind of plumbing there's going to be. They have the whole thing designed and blueprinted out before they even nail the first board up. The gardeners dig a hole, drop in a seed and water it. They kind of know what seed it is, they know if planted a fantasy seed or mystery seed or whatever. But as the plant comes up and they water it, they don't know how many branches it's going to have, they find out as it grows. And I'm much more a gardener than an architect.” 
― George R.R. Martin


Monday 24 August 2015

Microglaze resist tag 2

One of a kind

Following on from the tutorial I did using the distress microglaze recently (see it Here if you missed it) I finished off the second tag and have put the details over on the Country View Crafts Project Blog.
This is just a sneak peek to whet your appetite and I hope you can join me at CVC to see more.


Thanks for stopping by and have a great week.

hugs Brenda xxx


UPDATED FROM CVC PROJECT BLOG


Hello it's Brenda here bringing you a tag using a tutorial I did on my blog a little while ago using the Tim Holtz Microglaze as a resist. To find it and maybe try it out press here.


The original tag looked like this before and after the microglaze treatment. It was a mop up tag taken from a box of leftovers I keep...


... and here it has been blended with distress inks after the microglaze had been applied through a stencil.


Before I made up the tag I added some very light text stamping using walnut stain distress ink.


I gathered together the elements I thought would go with the design in my head ...


... but you will see I added a couple more when completing it. This is the tiny punched bird from Tim Holtz's range of new punches ....


... and this is one of the tiny tattered flowers.


I painted and cut out the flower and stem using the flower garden set of stamps....


... and you can see the resist background, the number stencil worked really well.


Do you think I am moving to autumn mode already? Looks like it to me but I guess it won't be long.


Have a wonderful weekend and let us know if you try out the microglaze resist technique.

hugs Brenda xxx


Saturday 22 August 2015

Microglaze resist tag 1

Capture Beautiful Dreams


This is one of the follow up tags from the tutorial I did using the distress microglaze as a resist - if you missed the tutorial you can find it HERE.
You may remember the tag began this life as a mop up from my spare box of bits ...


... and had the microglaze treatment through a stencil.


 It looked like this before I blended more distress inks over it.


To make up the tag I collected elements I wanted to put together, but as always they changed and got added to as you will see in the finished photo.


I also stenciled through the latticework stencil with iced spruce and tea dye before using a small splatter stamp with picket fence distress paint. It was then ready to make up the design.


I changed the mini tag and added the numbers and a star, these helped complete the balance and interest of the final layout.


The sentiment was made up using chit chat stickers and I added a stamped pen nib too.


I love this picture from the photo booth collection. just a ticket a mini paperclip again add more interest, texture and depth.


With the film strip and numbers and a piece from a framework die the composition and design was complete.


There's tag 2 coming up in a couple of days so keep your eyes peeled to see how I used another of the tag collection from the tutorial.

Have a great weekend and thanks for stopping by.

hugs Brenda xxx


Thursday 20 August 2015

Destinations scrapping

Just a quickie from me today as I will be travelling home from holiday. Do you remember the album cover for the destinations challenge at AVJ and I said I was determined to make memory pages - well I have made a start and I have scrapped one using a photo and memorabilia from our weekend in Wales in July.


Using Tim Holtz correspondence papers and some of his chit-chat stickers, remnant rubs and cut ephemera I have now begun to record the places we visited.


It was a fabulous weekend meeting up with cousins from Cambridgeshire and cousins and their families in Pembrokeshire.


A simple page but I am pleased I have made a start.

Back to normal soon.

hugs Brenda xxx


Tuesday 18 August 2015

Distress micro glaze resist tutorial

I've enjoyed finding out how the distress micro glaze works recently and suddenly just wondered if it could be used as a resist - and guess what? It can.

It took me some experimenting to get the effects I wanted and several tags ended up in the bin but I finally got something I liked

To begin I took a mop up tag .....


... and one of the round mini blenders (which fits nicely into the micro glaze pot) and pounced it lightly in the micro glaze tub and then pounced it through a stencil. I followed Tim's instructions and gently rubbed it with my fingers (whilst the stencil is still in place) and when that felt as though it had rubbed in I took the stencil away and gently rubbed a paper towel over it.


 I then took some distress inks and blended them over the tag and you can see it partially worked. We have got a distressed imprint of the stencil image in some parts but the lighter area on the left side looks as though the micro glaze got rubbed away by the paper towel. I obviously hadn't rubbed it in well enough with my finger.

Here's a second mop up ......


.. with blended inks over it and this time it worked better but I think it was because of the large area exposed on the stencil.


And this is the third and you can just see on the photo below where I had rubbed on the micro glaze only this time I rubbed over it with a paper towel whilst the stencil was still in place and again gently after I took it off.


This time after I blended distress inks over it I got a much better impression and was really pleased with the result. If you look really closely on the lower part of the tag you can still see some of the distress from the first layer before the micro glaze was added.


So micro glaze seals distress inks so that they won't react with water again, it allows you to create more layers keeping the original design and colour underneath it. Tim has a great video on you tube which you should watch where he experiments with stamping and different types of paper/card.

Please let me know if you experiment with this technique and let me come and see your results and have fun. I'm off to finish these tags.

hugs Brenda xxx