Sunday 26 February 2012

My News

OK so now I can 'let that cat out of the bag' (I bet he feels better!!) and tell you that I have been asked to be a regular columnist for the brand spankin' new, rule breaking blogozine called 'UNRULY PAPERARTS' and I am so happy to be a member of the team for this new and exciting venture led by Shar (Gingersnap Creations fame).


If you haven't yet seen the blog you can find it at Unruly PaperArts (click the link) to find out what it is all about, but not only is it new, it is fresh and different and exciting. So do pop over and take a look.

I am going to be amongst some uber talented artists who create the most amazing works of art and together collectively will be sharing an incredible range of styles and genres. Can you tell I am excited? My column will be called 'Eclectic Elements' because that to me is where I am at. I love a range of styles, I love to experiment constantly with new techniques and I adore making cards, altering things, creating canvases and generally getting inky.

I hope you will please come and join us when we get started, you will be able to submit articles or projects as a guest contributor, you can participate in one of the unruly art dares and you can read articles, find tutorials and generally immerse yourself in all things arty. The first 'Front Cover' will be coming out on April 1st.

Take care and most of all have fun with your art.

hugs {brenda} xox


Photobucket

PanPastels - Use a ribbon

It's Sunday, my second post for today and another PanPastel UK challenge, so I hope you will join us with a project that has ribbon on it and be in a with a chance of winning a fabulous set of PanPastels from our generous sponsor - Your Creativity Store.


Both patterned square pieces were first covered lightly with PPs. The top piece then stamped with a Darkroom Door background stamp in cranberry and on the other piece the flourish was stamped in eggplant.


I love the Wendy Vecchi dress form and have used it simply on it's own as the main image, but added lots of ribbon, tied in a bow and made ribbon roses for embellishments.


Have a wonderful Sunday. Are you doing anything exciting today?

luv and hugs {brenda} xoxox


Photobucket

Fashionable Stamping Challenges - For a child

Hello, it's Sunday and another fab challenge at FSC. The theme for you for the next fortnight is to create something for a child. My two little grandaughters will both be having birthdays in the summer so I decided to make a card for one of them.


The stamp is Molly Blooms and one of several that I won at Sir Stampalot last year. 


Now I don't do cute so this had to be made to look 'vintagey', I think I succeeded. Papers are from the mariposa stack, desert blooms, DCWV naturals and costco - what a mix eh?


The shabby ribbon I died myself to the colours I wanted, the rosette is a TH die but I cut it narrower to make it smaller than the original and the bunting I made by hand.


The DT have created some magnificent samples for you as usual and you could be the winner of a voucher from Cottage Crafts (details on the main blog), but of course you have to be 'in it to win it' as they say, so I hope to see you over there.

I had a fabulous day demoing at The Art of Craft yesterday, lots of TH techniques using distress inks and some really lovely ladies who wanted to know more about how to use them.

 I have some amazing news to share, but can't let the cat out of the bag just yet.

Enjoy your Sunday and thanks for taking the time to visit me.

hugs {brenda} xox

Photobucket

Friday 24 February 2012

The Stamp Man - Colours of Spring/Easter

Hi Everyone

This is a scheduled post as I am at the Five craft show at Farnborough today and tomorrow I will be demoing all day at The Art of Craft shop, just down the road from the Five show, so if you are in the area do pop in and see me, it would be lovely to see blogging friends. Jane (store owner) will be at the show, so if you are not sure where the shop is pop over to her stand and she will give you directions, but I can assure you it is less than a mile away.

This tag is my take on Tim's Tag 10 of the 12 Tags of Christmas 2011. Have you seen he's not going to do them anymore BUT HE IS doing 12 tags of 2012. So cool. I've got to get into these now.
Did you see him on QVC? I spent a bit of money on Tuesday - but never mind.
In fact some of the things have already arrived.


Supplies -
Stamps - Spiralling floral bkg by B Line, Natures Moments by Tim Holtz
Tim Holtz Seasonal paper stash
Distress inks - Bundled sage, Victorian Velvet, Aged Mahogany
Dies - Tattered Banners, Tattered Florals, Mini Florals, Typeset
Distress Stains - Victorian Velvet, Wild Honey

I hope you can join us at The Stamp Man for our new challenge and be in with a chance of winning a £10 voucher to spend at Jill's store. Please go take a look at the amazing inspiration from the design team, their wonderful art will surely get you kick started.

Hope you have a fabulous weekend.

hugs {brenda} xox


Photobucket

Sunday 19 February 2012

PanPastels - Animals

Hi Everyone

Today I want to show you how to create a vintage feel to your image and background. This is my DT piece for the PanPastel UK challenge this week and as you can see the theme is animals. So let's see what you can do, you don't have to use PanPastels to be eligible to enter.


The card used for the back of the stamped giraffe image is Bazzil Basics in a weathered wood colour, covered with magenta, orange and turquoise shade PanPastels. I just love the texture it has created. Stamps are from TH Papillon and Katzelkraft Cirque 01. The main images stamped in timber brown Stazon first then masked off to stamp the background with iced spruce DI. Sealed with Daler Rowney fixative and then embossed all over with clear embossing powder.


The backing paper was made from a piece of patterned DP which was then given the embossing ink through a mask and PanPastels turquoise added and fixed, then over-stamped with a dotty stamp using fresco finish vintage lace paint. 
The blue squared effect is the PPs on top of the DP.


The other pieces for the backing have been distress edged and inked. The rosette has been topped with a vintage elephant image downloaded from the Graphics Fairy in a bottletop.


PanPastels can really give you so much more depth to your papers and can also enable you to produce fabulous vintage effects. If you haven't tried them yet watch out for a give-away I will be doing soon, you never know you might be the proud owner of some. Or if you can't wait why not pop over to Your Creativity Store to see the colours and get a fantastic price on them.

Next week we create a completely different look and use mirri-board in two different ways to create a shabby feel to a card. There is one technique I prefer over the other though.
luv and hugs {brenda} xoxox


Photobucket

Thursday 16 February 2012

Altered matchboxes and PSE tutorial

HI Everyone

I have been out today to see my sis and we had some time to finish a project we started back last November, but more about that another day.


It was fabulous to have Shirley (FSC), Irene, Claire and Amber come round for some crafty time together last night. 
Irene had been collecting matchboxes, so our challenge was to alter one in any way we wanted. 
We had great fun chatting whilst creating and making and the pics tell the story.

Left to right - Irene, Shirley, Amber and Claire.


You can see both the inside and outside of the boxes.

The girls did very shabby chic styles using gesso, paints, inks, fabrics as well as music paper.
Mine was more grungy and is meant to look like a suitcase - that's because I know exactly who this is for, but I can't share who that person is at the moment.

I think you'll agree everyone did a great job altering their matchbox, we had such great fun.


Yesterday I showed some photos with faded edges. I decided I wanted to learn how to do this and have found several ways of experimenting to get the sort of style I like. Sue asked if I would do a tutorial to show how I had done it. So here goes, I am using Photo Shop Elements 7.

1. Open the photograph you want to use; crop and edit.

2. Select the Eliptical Marquee Tool.

3. Click the image in the top left hand corner and drag to the bottom right hand corner to get the shape you want to work with.

4. Go to Select on the top menu bar and click 'Feather', then enter a radius amount. play with different numbers to see what effects you can achieve. Press ok.


5. Go to Select again and then click on 'Inverse' and ok.

6. Go to Edit and click 'Fill Layer' - here you can choose what you want for colour etc. I had my background set on white so I chose that.


7. Save your new photo with a different name so that you don't lose your original.


This one was feathered at 75 pixels


This was was feathered at 50 pixels.

I hope you find this useful Sue. As you can see I haven't used any brushes at all using this technique.

Have a good end of the week and thanks for stopping by today.

hugs {brenda} xox


Photobucket

Wednesday 15 February 2012

Birthday Hybrid card

Hi All

Did you have a good Valentine's Day yesterday? My OH had a meeting in London which only lasted the morning, so I got the train up and met him at Waterloo and we had a lovely afternoon walking round the streets, with a visit to Covent Garden where we sat sipping wine and listening to a quintet of violinists with one oboe player, playing music. We explored the market and after a great meal we headed back home walking across the golden jubilee footbridge and taking in the amazing sky line of London in the dark.

So for today here is another card created in PSE using downloaded image, papers and elements and just a couple of 3d embellishments on it.


I used the same elements to create the insert for the card.

Another easy one to put in the post box!

Have a great day and thanks for stopping by to see me.

hugs {brenda] xox


EDIT and update
I am trying to learn some functions in PSE and have found out how to fade the edges - thought I would see what this looks like on the blog. Not bad but must try some other effects.


Update 2
OK found another way to fade the edges, think I might prefer this way!!


xox


Photobucket

Monday 13 February 2012

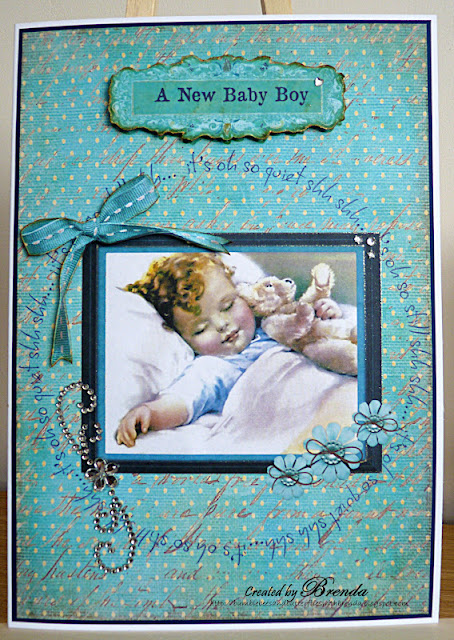
New baby hybrid cards

Hello Everyone


I had a surprise phone call today from Shirley (Fashionable Stamping Challenges) who is back in the area for a week and we met up today with Claire, Amber and Irene to have a natter and to craft a little bit. I had hoped I would be seeing her Wednesday night but wasn't expecting to see her today, so that was a lovely treat. Thanks for a great day girls.

So onto my cards for today. My son's best friend and his wife have just had a baby girl and because they didn't know what sex it would be I made a card both for a baby girl and a baby boy.


I used downloaded images, papers and elements to create these in PSE, then added some decoupaged and 3D embellishments to them once I had finished. I need to make more of this type of card as they are flat and will post with a normal stamp on them. You know how expensive it is now to send anything that won't go through that thin slot in the post office!!

I found a fabulous site selling scrapbook digi kits called 'Digital Crea' and very reasonable prices too. Just love the elements that are included with papers. My images I think came from 'The Graphics Fairy'.

I hope your week goes well. Thanks for stopping by today.

hugs {brenda] xox

Photobucket

Sunday 12 February 2012

Tag - keep me flying high

Happy Sunday to you all, I hope it is a good day wherever you are. I had a text from Maddie early this morning to say she had landed in Singapore and was on her way to the hotel.

Well this is my third post for today (never been known before!!), the other two are DT pieces, this one is just for me.

I am really disappointed I can't go to the Stamperama show. My car is still in the garage and is gonna cost me mega bucks as it needs new tyres, new windscreen and new cam-belt just to name a few bits. So that's my purse strings tied for a while.

Anyway instead I've had some fun amalgamating a number of challenges to produce this tag. Inspired by Simon Says Stamp and Show - a recipe of torn (I cheated a tiny bit, I haven't got torn edges but I have got torn fabric for the top), DIs, button and wings, Gingersnap Creations - glorious greens and Rogue Redhead Designs - a stamped background. It was Saturday show and Hels - picket stain distress stains resist that started me off and fits the Sunday Stamper challenge - I will always love you. Thanks Hels. This also reminded me of 'High' by The Lighthouse Family and the sentiment is some of the words from the song.


I have used a number of different stamp sets - Crafty Individuals, B Line Designs, Oxford Impressions, Darkroom Door, Our daily Bread and TH. I used shabby shutters, peeled paint, forest moss and pesto for my gorgeous greens. The bird cage was stamped onto some Basic Grey paper. Do you like the bird sitting on her nest? Roll on Spring I say.

The bird cage wings were painted with DIs and the covered with rock candy crackle paint and the birds were heat embossed to make them 'pop' more.

I will keep this tag for my Hubbie when it is his birthday later in the year.

Have fun and thanks so much for stopping by, I really appreciate all the lovely comments you leave me.

hugs {brenda} xox


Photobucket