Sunday 31 May 2020

The Gold that Glittered - Media Tile

Inspired by Sid Dickens
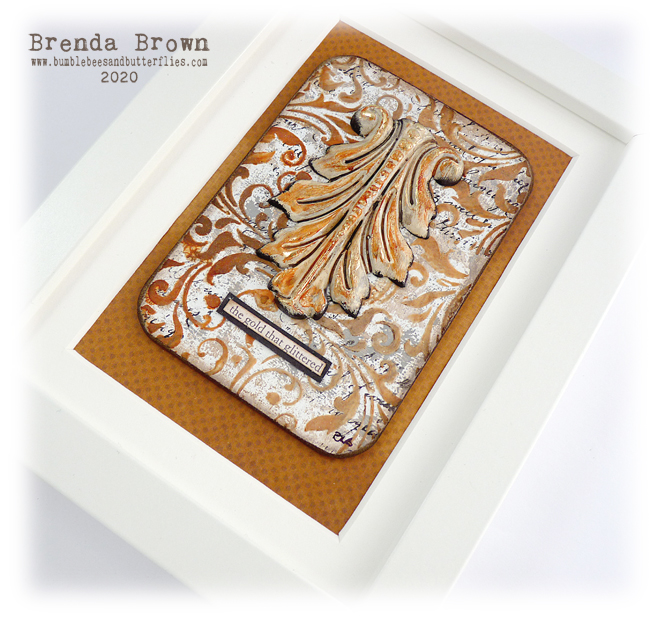
Another media tile framed.


Process Steps
1. Seal the board with tinting base.
2. With a small brayer very lightly roll on burnt umber and white mixed together,; repeat with medium grey,
3. Stamp text.
4. Take white modeling paste and a drop of burnt umber mix a little together scrape through a small area of a stencil, repeat by mixing quin gold with the modeling paste and repeat by getting different shades each time you scrape through. If necessary dry the surface of the modeling paste before repeating in a different area of the tile.


5. Sand and distress the edges blending in brown distress inks.
6. Take the mould and seal it with gesso/tinting base or chalk paint. Drip some burnt umber and quinacridone gold mixed together into the channels.
7. Finger rub some quin gold over the raised areas.
8. Give wishes of paynes grey and quin gold.
9. With a small piece of sponge dab carbon black around the edges.


10. When dry finger rub some metal leaf size over the raised surfaces and leave to get tacky for at least 15 minutes before adding the gold foil.


11. Add the mould and some words and frame it.


Supplies from DecoArt
White Tinting Base
Media Fluid Acrylics - Burnt Umber, Medium Grey, Quinacridone Gold, Titanium White, Raw Umber, Paynes Grey, Carbon Black

Wednesday 27 May 2020

Revisiting old techniques - Blended acrylics

I originally discovered this blending technique when making and experimenting with the blending tool and my decoart media acrylic paints for a tag for AVJ and then I used it for an experimental post for the DecoArt Media Team blog. I am revisiting this technique again as I create a board for my resource box of techniques.


Process steps
Firstly scrape gesso over the surface of the tag and dry. It is fine to create a little texture here.

Step 1 Use a blending tool and foam, choose a light colour acrylic paint (Titan Buff). Taking a small amount and some glazing medium, blend from the craft mat onto the tag, just like you would do with distress inks. Rub with dry kitchen towel and or wetwipe to get effects you like.

Step 2 - Buff the surface with a soft cloth.

Step 3 - Repeat steps 1 and 2 with a couple more colours, deepening them towards the edges Cobalt Blue Hue, Transparent Yellow Iron Oxide, Burnt Umber.


Step 4 - Very lightly stamp flourish/texture/pattern and text stamps using a similar colour to the background to get and light and almost monochrome effect with them. (archival peat moss).


Step 5 - Blend some darker colours around the edges of the tag as in steps 1 and 2 and very lightly splatter with them.


Step 6 - Dabble raw umber, paynes grey. quin gold at the very edge to create a timeworn vintage look.
I used a greyboad media tile and sanded the edges and blended in ground espresso distress ink.


Optional - You will see from the panels on the DecoArt post I also painted in the swirls and made the stamping more evident than in the AVJ tag.


xxx


Saturday 23 May 2020

Revisiting old techniques - watery layers with stencilled textures

Here's another of my techniques and layer combinations using acrylic paints. I like to turn to these when needing some inspiration and I have been documenting them on media boards as a resource.
You will find them added to my Tutorials and step x steps page found on my sidebar.

This one - Watery Layers with Stenciled Texturen- I taught at Ministry of Mixology in April 2019.


Process steps
1. Apply black modeling paste through a stencil. Leave to dry.
2. When the paste is dry paint a coat of white gesso over the whole piece.
3. Paint watery acrylic washes over the whole surface and dab with some kitchen paper to remove some of it from the gesso. Dry.
4. Mix a little prussian blue hue 50:50 with glazing medium and paint over the tag and gently rub back with dry kitchen roll and a babywipe keeping the dark blue to the edges.
5. Mix a little quinacridone gold with water, dribble on one place spritz with water and move around and dab some off with dry kitchen paper before drying. Repeat in another couple of random places.
6. Mix a little paynes grey with water and dribble around the edges, spritz with water and dry. I worked on about a 2 inch spread at a time.
7. Using a small brayer, roll carbon black paint over the raised areas, if some catches in the background don’t worry it adds to the distressed look.


Or a little different -

 
Step 1- Apply some gesso to the  board, squidge it on the craft mat/palette. Dry
Step 2 - Use white modeling paste with white with acrylic paint added to it and apply through a stencil - leave to dry.
Step 3 - Add some dip, drip and dry washes.
Step 4 - Lightly sand raised textures to get some of the colour back.
Step 5 - Add some splatters.
Step 6 - Using a palette knife drag clear crackle glaze around the edges and leave to dry.
Step 7 - Cover crackles with titanium white antiquing cream, leave to dry and wipe back.
Step 8 - Sand the edges and add some quinacridone gold and prussian blue around the edge to frame it.


xxx

Thursday 21 May 2020

Andy Skinner new release - Shabby Timeworn Panel

A very timeworn shabby project I've made for Andy Skinner and his new releases today.


Process Steps
1. Take a piece of greyboard and score 3 lines vertically to start it looking like old floorboards. 
      Give it a coat of chestnut to seal it. Dry. Repeat the painting on two panels cut from thinner greyboard to fit horizontally across the main board.


2. Take Lava Paste and a brayer and lightly roll across the panels and heat dry. Then randomly rub a candle over the surface.


3. Paint a coat of ocean breeze, Gently heat and wipe with a dry paper towel to remove a some of the paint.


4. Repeat the process of rubbing the candle wax and paint - this time use a white chalk paint, and rubbing it back as you've dried it. Give a coat of super matt varnish. Leave to dry. This seals the wax coat so you can ad more paint layers.


5. Cut another piece of grey board for your centre piece. Give it two coats of white chalk paint and using rust paint stamp stone wash stamp and dry before giving it a watery wash of ocean breeze.


6. Take the centre piece again sand the edges and dabble quinacridone gold over it, dry and rub  coffee a archival ink pad round the edges.


7. Back to the larger board and panels, bend along the score lines to open them up again, drag a pointy tool down them and repeat the sanding and distressing as in step 6. Also run the archival ink pad over the top of the lava paste texture to highlight it and make this look more like wood panels


Now assemble the project and add some distressed embellishments like Andy's rusty cogs, transfers and adhere a rice paper image to the centre piece.


Products available from Country View Crafts.


xxx


Supplies
Andy Skinner Creative Expressions Artist Pigment Paint - Rust, Quinacridone Gold
Andy Skinner Creative Expressions Matt Chalk Paint - Chestnut, Ocean Breeze
Andy Skinner Creative Expressions Rice Paper - Vintage
Andy Skinner Creative Expressions Stamp - Stone Wash
Andy Skinner Creative Expressions - Super Matt Varnish
Andy Skinner Creative Expressions - Transfers
Miscellaneous - White Chalk Paint, candle, Coffee Archival Ink


Tuesday 19 May 2020

Stencilled background with acrylic paints - new technique

I have been revisiting old techniques and posting them recently but this one came out of the blue and is now a new technique I'm sure I will call on often.
I was so excited at the results of the layers building this background and made it into a card for this post.

Process steps

1. Scrape a layer of tinting base over the card using a palette knife.
2. Mix a watery wash using the most tiniest pin prick amounts of cobalt teal and grey paint. Dip and dry.
3. Into what is left of the wash add a tiny amount of primary yellow and repeat step 2.
4. Mix a new wash of prussian blue and repeat step 2.


5. Add tiny dots of the yellow, cobalt and prussian blues on a palette. Take a stencil, a small blender with blending foam and a water spritzer. Spritz over the stencil so water goes through onto the background, pick up tiny amounts of one or two of the colours at a time and blend through the stencil and dry.
See this technique also stepped out for a Spring card.


6. Use embossing powders and a text stamp for interest.
7. Spread some resist paste randomly over and paint over a layer of olive grove leave to dry.
8. Rub away with dry kitchen towel and a wetwipe to reveal most of what is underneath again - some of the original background seemed to fade - did I rub too hard?
9. Repeat step 7 using eternal chalk paint this time.
10. Repeat step 8.
11. Scrape some random patches of white crackle paste around the edges and leave to dry.
12. I found that some of the crackle dropped off when I went back to it and I'm sure it must have been because of the resist paste, so I gave it a coat of soft touch varnish and again left to dry. That sealed it in place.


I also made a technique bord using different colours
step 2 - phthalo turquoise and medium grey.
step 3 - add naphthal red
step 4 - prussian blue.
step 5 - create different mixes using naphthal red, diarylide yellow, cerulean blue, prussian blue, titanium white, titan buff - going back over the shapes with different blends of colours to create overlays and depth.


Love the Moroccan/Spanish feel to the design and to see what different effects can be achieved.


xxx


Friday 15 May 2020

More 'Lockdown' creative time

Thank you to Alison (Words and Pictures) and Nikki (Addicted to Art) for another fabulous creative and chatty session on Sunday. We all worked on our journals with me creating a panel to add to a collage in my vintage journal.
I have to say having a couple of crafting buddies who ca get together in this way gives us a very therapeutic window of time in this pandemic lockdown and provides us with an opportunity to catch up and enjoy just being with other people we know and love.


The background panel started with a layer of tinting base scraped across a piece of card with some washes of burnt sienna, raw umber, paynes grey and titan buff and dried before adding the stars. These were created with one of Tim's shifter stencils and the above colours as well as quinacridone gold, raw sienna. burnt umber, carbon black, titanium white and pyrrole red. I used a small blending tool and foam to layer the colours through randomly.


I started collecting some pieces together to begin the collage .....


...... working just on the panel to begin with. 


When I was happy with that I then brought together more oddments to build the page collage. All of the bits are from snippet boxes I keep, both of papers, words, fabrics and die-cuts. I love using up leftovers in this way.


If you have a moment please pop over to see the fabulous designs by my lovely intrenet companions.

Nikki

Alison


xxx


Monday 11 May 2020

Revisiting old techniques - watery layers with wax resist

I'm still going back to old layering paint techniques and adding other layers to them. This time I also mixed my paints for nearly every layer, I just love experimenting with colours to see what appears.


Process steps
1. Seal substrate with gesso.
2. Mix dark pinky red using quin red, titan buff, titanium white, burnt umber, paint layer over the whole surface, splatter water droplets, heat a little, soak up excess water with kitchen roll.
3. Repeat by adding diarylide yellow and pyrrole red to the left over mix.
4. Repeat by adding titan buff, titanium white to the mix.
5. Rub wax over the surface, paint a layer of titanium white only, heat gently and rub away with kitchen roll. If not enough rubs away  carry on heating small areas and rubbing in the opposite direction until you are happy with it.
6. Repeat step 5 several times by lightening the colour each time and also experiment with not heat drying the surface at the end.


 Having got the painty layers for your background - you could go on to add more layers with some stamping ..............


 ............. transfers or rub-ons .............


........ some die-cuts ...........


............... some stamped ephemera or images ..........


................... a vintage photo ....................


...... or maybe a completely different set of further layers. These were just for ideas.


xxx


Thursday 7 May 2020

A shorter Skype session with friends - mixed media board

Last Saturday my great skyping buddies Nikki (Addicted to Art) and Alison (Words and Pictures) and I met together for a short, just for fun 'do what you want', session to keep our hand in with creating and making and at the same time had a lovely catch-up.
I decided to use four words to work with that come from the first four days of the Creative Expressions FaceBook Mixed Media Mayhem challenges for May. Bright, Crackled, Stencilled and Distressed.


I created a background of brayered layers of Andy's chalk paints and white gesso adding in some stamping (that more or less got covered up :o) ).


The CREATE was stencilled using white texture paste and when perfectly dry I replaced the stencil and dabbed some of the chalk paints over it to help it blend with the background and outlined it with white posca pen. 


I painted the industrial wing with the  mustard and ocean breeze paints, let it dry then scraped some clear crackle glaze in random places. When that was dry I painted on white antiquing cream, left it to dry and rubbed away to reveal the cracks. Next I stamped with the grey haze.


A small round circular piece of Tando greyboard was painted with grey haze and titanium white paint mixed and Andy's eye transfer rubbed on.
The flaming heart was painted with grey haze, wash od the haze and white dabbled on, stamped with white tinting base and then splattered with ocean breeze and haze mixed.
I just used my fingers to add layers of the paints to the ring and splattered with grey haze.
      

Once put together =


It would be great if you popped over to see the other two projects - we had no theme this time - just to do what we liked, so these are very different. Here are their sneak peeks.


xxxx


Products used
Andy Skinner Chalk Paints by Creative Expressions - Ocean Breeze, London Brick, Grey Haze, Mustard Seed.
Andy Skinner embellishments by Tando Creative - Industrial Wings, Flaming Heart
Andy Skinner stencil (Inspire) and stamp (Create)
Andy Skinner Transfers - Poe Diversity
DecoArt - Clear Crackle glaze, White Gesso, Tinting base, White Antiquing Cream, Titanium White Media acrylic paint