Wednesday 31 January 2018

Panel 4 - A fossil hunter needs sharp eyes.

I think this is going to be one of my favourites from this set of fossil panels, I just love the way it turned out. I used Andy's large ammonite stencil on it and one of his older sets of stamps (Steampunk).


Process steps
1. Seal the card with a layer of tinting base.
 2. Using the dip and dry technique and watery washes start with raw umber - dry. Add a little cobalt blue to it, dip and dry. Add a little more cobalt blue and some titan buff, dip and dry. Add some titanium white to the mix and repeat.
3. Using the large ammonite stencil apply titanium white through it which leaves the stencil shape showing with those beautiful watery hues.


4. Give the panel a dirty wash of green gold, paynes grey and quinacridone gold.
5. Stamp the fish with watering can and coffee archival ink.
6. Stamp some text and diagram with the same colours.


Can you see I added an eye to this one? It is from one of the Tim Holtz remnant rubs sheets.


I've worked out I need at least 15 of these panels for the journal I want to make so there will be quite a few to come yet - hope you're not getting bored of them.

Thanks for stopping by.

hugs Brenda xxx


Monday 29 January 2018

Vintage Heart Tag

I'm enjoying playing with some new stamps being released by Andy through Stampendous and more elements from the Tagtastic kit 2 from Tando Creative. I made this to share on Andy's blog today.


The tag from Tagtastic 2 kit is being released in February at Stitches. I love the uneven edge it has to it. I began by using some left over silver and white gesso mixed together and brayering it lightly over the surface.


I then dipped and dried in watery vintage photo and ground espresso distress inks to create a lovely vintage look.


Next I used a texture stamp from the Textures set using watering can archival ink and gave it a blast of the heat gun.

Using DecoArt media crackle paste and one of Andy's stencils I create some textured text and put it to one side to dry naturally. I was so in the moment of creating I didn't get a photo of this step but you can see the effects in this one.


Taking the heart which is from the kit I ran it through an embossing folder and gave it a coat of raw sienna, raw umber and paynes grey lightly stippled to blend the colours together .....


.... then dried it and painted over with quinacridone gold.


Again when dry I lightly sanded the high spots of the embossing .....


..... and then dipped it in a watery mix of titanium white and cobalt turquoise hue - this knocked back the rusty look a little too much for me so I dribbled some watery quin gold through.


Finally I collected up and altered some little bits and going back to my vintage roots found a little photo to add.


I used another of the text texture stamps on the little label and a chit chat word.


It was great putting together a vintage style for a change and of course I love using the old photos as focal elements.


Thanks for stopping by and joining me as I embark on yet another stage of my creative journey. It's fabulous being part of a new Team and seeing all the inspiration that comes from the other members - you can see Andy's blog here to see what they are making too.

hugs Brenda xxx


Saturday 27 January 2018

Tando Creative - Stencils

The theme for this week at TC is 'masks and stencils'. I'm sure there are a number of people who don't know the difference between them and many think you can exchange the words for the same products, but that's just not the case. Let's just take a refresher for a moment - a stencil gives you a positive shape/pattern when you ink or run texture paste through it, a mask gives you the negative shape - it really is that simple.


I have used a number of stencils with the DecoArt media acrylics and just one bit of stamping - check out the brand new Andy Skinner Textures set from Stampendous. You can get some wonderful mixed media layers for a background using them with some distressed layers of paint inbetween - check out the Tando blog to see how I created them.


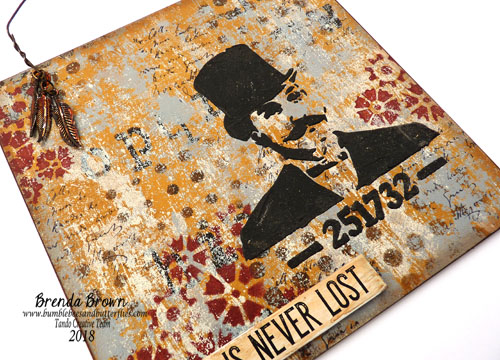
The wonderful gentleman is another Andy stencil used with black modeling paste and this gives such a powerful contrast to the background.


A few embellishments and it's done.


I hope you can pop over to the Tando blog to see what other lovely projects have been posted on this theme and perhaps leave a little love.


Thanks for stopping by.

hugs Brenda xxx


Updated -- copied over from the Tando blog

I began by painting raw sienna and gold media acrylic paints on the substrate and then used black acrylic through an Andy Skinner stencil.


I love this technique of creating distressed painty layers - I painted titan buff onto the card and then rubbed it onto the board - it covers some of the background and some of the stenciling ....


... and so the mottled layering begins.


 Why not mix your own colours too? Having used the black I added some vermillion and created this dark brown and stencilled the dots.


Not wanting to waste the bit left over I mixed it with pyrrole red to create this lovely burgundy shade that I used with the Tando mini cogs stencil.


A little bit of stamping and a little more monoprinted titan buff and I'm happy with the background.


But I haven't finished with the stencils just yet. I took the steampunk one by Andy and with black modeling paste created the focal image .....


... and finished with a quote and some embellishments suspended from a rusty wire hanging.


I hope you have fun with your stencils this week.

Wednesday 24 January 2018

Panel 3 - Coiled chambered fossil shells - Freebie

Number three in the fossil card series and this shows one of the gorgeous ammonite shapes that Andy has in his new set of stamps with Stampendous. My previous post has more details about them which you can find here if you missed it.


Process steps
1. Seal the panel with tinting base.
2. Brayer watery titan buff mixed with raw umber over the surface.
3. Using Andy's 'shedded' stencil blend through some sap green and titan buff.
4. Stamp ferns and small ammonite at the base of the card using leaf green, coffee and dandelion archival inks.
5. Dip, spritz and dry watery washes of cobalt blue mixed with titan buff.
6. Stamp some text with titan buff and quinacridone gold.


7. I had a dried mop up piece of kitchen roll which had some lovely bright autumnal colours on it so I stamped the ammonite on it using coffee archival, wet the edges around it and pulled it out to get a soft distressed edge to the shape.
8. Adhere this to the panel with matte medium and cover the whole panel with it.


9. Add your words.


I love the text stamped in the paints they bring all the colours together.


Like the title of my post says I have a freebie for you. If you want to use the words I have made up for myself click the image below to enlarge it and save to your computer. This is a jpg image and A5 size. Enjoy.


Thanks for stopping by.

hugs Brenda xxx


Monday 22 January 2018

Panel 2 - Unearthing the mystery of life on land

Here's panel 2 in this series of Fossil cards - the introduction and first one can be found here if you missed it.
I'm having great fun playing with Andy Skinner's new stamps, two sets are with Stampendous and the others are with a new collaboration between himself and France Papillon called Illusionary Artists.
My main focus is on the Fossils set which you buy from Tando Creative.


This little creature must have a name - Froglet perhaps?


Process steps
1. Seal the panel with tinting base.
2. Use a bubble stencil and cobalt blue, sap green and white titanium paints.
3. Stamp the froglet several times with coffee archival ink.


4. Brush some white gesso over randomly.
5. I stamped with the industrial texture stamp with weathered wood DI and covered it with microglaze but it still got lost in the next layers because it is water based.
6. Paint on a wash of quinacridone gold and paynes grey - this sat in small puddles over the wax of the microglaze.
7. Give it a coat of matte medium to seal it and provide tooth for the next layers.
8. Give it another wash of quin gold and payes grey.
9.Dip it in some watery titan buff.

I then stamped froglet using titan buff acrylic onto brown card and cut him out......


.... and finished with some more of my own computer generated words.

I hope you've had a great weekend.

hugs Brenda xxx


Saturday 20 January 2018

Make art nearly every other day - Panel 1 - Traces of Ancient Life

Ok, make art every day? I don't think I can commit to that - but nearly every other day? Well maybe but even then it's pushing it when larger projects need designing, making and written up for DT deadlines etc. So all I can say is I will try my best for three times a week.!!! 
I'm pleased to say I am no longer playing catch up and I am now at the point where I have been making samples as part of the Andy Skinner Creative Team for his new releases and ready for the CHSI Stitches show in Birmingham in a month's time. Using Andy's new stamps I have started a little project making just small pieces of art and these are something that has got me totally focussed and enjoying exploring background making and designing with a quick and satisfying finish to them. 


So this is panel one - they are all going to be the same size 7 cms wide by 10.8 cms in height and they are going into a journal - eventually! I am going to show you the panels in sequence but they will end up in a different order once I have enough to complete all the pages.
I sealed each of the panels using tinting base - half I brushed over the other half I used a palette knife to drag it over.
I then used a variety of ways to create backgrounds using a palette from titan buff, titanium white, cobalt blue, sap green, diarylide yellow, green gold, raw umber and quinacridone gold.

Process steps
1. Seal the panel with tinting base.
2. Dip into watery cobalt blue hue and dry.
3. Repeat step 2 with titan buff.
4. Stamp text with cornflower blue archival ink.
5. Stencil a layer using media acrylics.
6. Stencil dots with white crackle paste and leave to dry naturally.


7. Finish with a wash of paynes grey and quinacridone gold.


8. Stamp with two colors of archival inks on each print.


9. Add computer generated phrase.


Using the stamps and some of my own words to help bring them all together has been so rewarding I'm hoping that I can keep it up over a more prolonged length of time. More of all of that in a later post.

For now, have fun whenever you find some time to create.

hugs Brenda xxx

Thursday 18 January 2018

DecoArt Mixed Media team - Tag Box

I am so happy to be invited back as part of the DecoArt Mixed Media Design Team for 2018 and I have decorated a Tando Creative tag box for my first sample.


All the details can be see over on the DecoArt Mixed Media Blog.

hugs Brenda xxx

Monday 15 January 2018

Pretty Grunge Heart Tag

This is my first project for the Andy Skinner blog and I have used part of one of his new kits coming out at Stitches on the 18th February. I'll be there and I'm looking forward to meeting up with some of the other members of the team and friends. I will also be demoing on Andy's stand so if you're going do please come and say hello.
I'm calling this Pretty Grunge Heart Tag because working with Andy and his fabulous products gives me every opportunity to explore my grungier mixed media style but I also like to create more shabby and vintage stuff too - hence the pinks!!!


Process steps
Using a palette knife scrape white crackle paste randomly over the surface and leave to dry.


Whilst waiting paint the heart with everlasting chalk paint leaving some of the chipboard exposed and dry.  Spritz one side with water and add a little romance, then spritz the other side and add a little primitive, let the two slightly blend and move together - dry.


Dip into watery raw umber - dry ......


...... and then repeat in titanium white.


With a stencil add some splatter dots of embossing ink and sprinkle white embossing powder                      over it and heat set. Stamp a couple of crosses as kisses ....


..... and then cover with clear crackle glaze and leave to dry. Rub over some white creme wax and buff off the excess leaving the white in the cracks.
.

Paint the label and 52 with romance chalky finish and add a little relic to deepen it.

                                                     
Come back to the tag if it's dry and using pyrrole red and quinacridone magenta media acrylic paint some of each randomly and spritz with water letting the colours move around over the crackle areas. You will notice the colours remain on the exposed board areas. Let it completely dry.


Stamp some texture over using the everlasting chalky finish paint ....


... edge the tag with titanium white acrylic .....


  .......and splatter with some mixed colours to create more depth and interest .....


.... and dip into a watery wash of raw umber.


Seal with matte varnish

Take some cheesecloth and soak it in some watery everlasting paint. I love using the chalk paint on it as it helps to stiffen it which makes it look more distressed.


Use a stamp to create a word and adhere to the label frame and then seal with matte varnish. I used Andy's handle with care set.
Take a metal arrow paint with a slightly watery red and magenta used on the tag


And there we have it. You may well have seen that Andy has released lots of new stamps for this year and is working in partnership with France Papillon which is going to be amazing so watch this space for some samples coming up soon.


Have a great week. Please pop over to Andy's blog to not only see this tag but lots of other fabulous inspiration from the team.

hugs Brenda xxx


Andy Skinner and other related products
Tagtastic 2 kit - Released 18th February 2018
Stencil - Dot Stream

Stamp sets - Industrial, Shabby Chic, Handle With Care

Mixed Media Acrylics - pyrrole red, quinacridone magenta, titanium white, raw umber
Chalky Finish Paints - romance, relic, everlasting
Medium - white crackle paste, clear crackle glaze