Wednesday 31 October 2018

Happy Halloween

I have a post over on the Tando blog today sharing photos of a recent workshop I taught at Country View Crafts of a Halloween Triptych I originally made last year for the DecoArt Mixed Media blog.


If you would like to see how a fabulous group interpreted my boards please pop over here to the Tando Creative blog to see the results.

I hope today is full of treats and no tricks.

hugs Brenda xxx


Backward, turn backward,
Time, in your flight
make me a child again
just for to-night!

Elizabeth Akers Allen

Wednesday 24 October 2018

Halloween panel and giveaway winner

Well this just seems to have been the busiest year ever and I don't physically have to go out to work anymore!!!!! But of course all the commitments I have for teaching and projects for manufacturers, magazines, shops and design teams really is a job in itself now and keeps me on my toes.
Talking of being busy we had a new baby grandson born to my daughter and her partner at the end of July, went away on holiday in August with my son and family, came home to a period of catch up for DT projects, taught at the fabulous 'In House Crafts' shop in Pembrokeshire towards the end of September and within 36 hours of getting home we were off again for nearly 3 weeks in California and literally 36 hours after our return last week I was teaching for Susan at Country View Crafts. I am so lucky and feel truly blessed to be able to do all of these things and have a wonderful hubby and family around me as well as lots of amazing friends and crafting buddies.

Anyway - I managed to squeeze a few supplies into my case coming home from the USA and of course added to them on my visit to Susan so I have been itching to get back to the work desk. I decided to delve into a little bit of Halloween fun and used one of the new Halloween Worn Wallpaper pieces from Tim Holtz and the packaging it came in to create a spooky panel.


I cut the packaging down to size and added some black distress paint and vintage photo distress oxide round the edging to continue what had already been printed on it.


Taking the worn wallpaper I altered it also with walnut stain and vintage photo oxides around the edges, blending, spritzing with water and dipping them into the watery colours on my mat. I then took carved pumpkin and spiced marmalade oxides and splattered using weatery mixes and also added some white acrylic ink to them to splatter with as well.


Next I gathered some collage layers, die-cuts and a framed portrait to start building my design.


When I got home last week so many of my flowers were still in bloom but starting to fade with the onset of autumn so I gathered some of them and some beautifully turned leaves and dried them in the microwave.


These salvias had been dried and sprayed with DecoArt matte acrylic spray but they were still very fragile. I ended up using DecoArt's decou-page glue to add them to the finished piece then painted some over the top of the flowers, covering it with wax paper and popping it under a heavy box for a few hours. This made them more durable.


Next- huge apologies for the lateness in choosing a winner for my giveaway which should have been chosen quite a few weeks ago - but all those life things above got in the way. I have now entered 15 comments into Random Org to generate a winner and we have  -

Congratulations to #13 who is Kate Yetter.

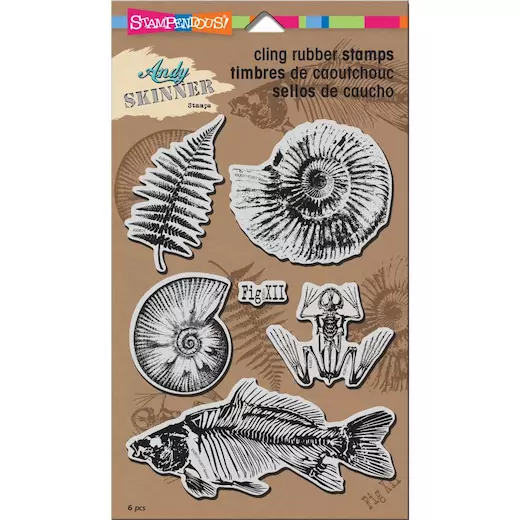
Kate wins the fossil stamps by Andy Skinner.


Woo hoo Kate, if you could send me your snail mail address I'll get them in the post to you. My email is on my side bar.

Thank you to everyone who entered I really appreciate your time in visiting my blog and leaving a comment.


That's my little bit of catch up and spooky art for today.

xxx


Friday 12 October 2018

Make today Count - panel to mini book.

Gosh I'm still showing projects I made earlier in the year - but I'm so glad I had a few held back as it enabled me to spend lots of time in my garden during the warm weather - and I'm still catching up with project deadlines now.
Here's the panel I made.


Proces steps
1.      Seal the substrate with tinting base. 
2.      Use premium acrylic paints in cobalt teal hue, primary yellow, burnt umber, pyrrole red and titanium white. Blend them randomly through a stencil (Prima).
3.      Take media acrylics in translucent white, cobalt teal hue and phthalo green blue (all translucent colours) and blend over the background with satin varnish on a sponge. 
4.      If too dark rub over with dry kitchen roll and then spread translucent white with satin varnish over, let it pool, dab some off if necessary and dry. 
5.      Dip and dry in cobalt blue and titanium white mixed media acrylics. 
6.      Repeat step 4 with raw umber media acrylic. 
7.      Splatter with white media acrylic. 
8.      Add some random and torn tissue tape. 
9.      Stamp with black archival ink. 
10.  Add embellishments. 
11.  Sand and ink the edges.

Stamps are by Andy Skinner. This is from the Stampendous Shabby Chic set.


Paper dolls by Tim Holtz.


So that was the panel finished ......


..... but I decided to use it to make another little book for my shop space.


The pages are from a watercolour paper pad cut to size ....


.... and I used green thread to match in with the colour tones.


I used a coptic binding so that the journal open right out and lies flat when you use it.


I just simply tied it up with ribbon to keep it closed.


Making art on panels is a fabulous way to create and then to use the panel to make a book of your own is even more pleasurable.

xxx


Thursday 4 October 2018

Mixed media Collage Journalling for DecoArt

This is a project I created as part of the DecoArt Mixed Media Design Team which went live on the DecoArt Media Blog back in July - see here.
I am now publishing it on my blog to keep an accurate record of the projects I make and my creative journey.

***************************

I have missed using an old book as a journal so I decided to go buy myself a couple from a local book charity shop and picked up three for £1 each, I love a bargain. I created the front cover for another design team project with a Victorian cabinet card and bits of ephemera I decided I wanted to get back to some vintage creations snf thought this altered book would be a good place to get going on them again. I have lots of old book papers, maps and Tim Holtz ephemera as well as vintage photos both original and bought printed ones so I was excited to get going.


I  glued some pages together and sealed them with white gesso and when it was dry I used matte medium to adhere some of my ephemera and torn book pages making sure I sealed over the top of them with it. Give it a blast of the heat gun and then leave it to completely dry.


If you have piece of the papers overhanging the sides don't worry about cutting them off yet, wait until they are perfectly dry and do it then.


TOP TIP
I place a piece of waxed paper behind both of the pages I am gluing or painting on which protects the pages behind from paints or mediums as you go up to and over the edges of the pages. I also make sure I have a piece between those pages I am working on if I close the book and put it under a heavy box to flatten out before going onto the next stage or when I have finished.


Now the pages are dry take the white gesso and a palette knife and scrape some over the pages with a couple of thick patches. 


Take the heat gun and give it a blast until you have dried the thin areas but the thicker patches of gesso have a skin on them but are still squidgy underneath. Now take a stamp and press it into those squidgy areas. Priming it with clear embossing ink can help prevent the gesso sticking to your stamp. You will get some lovely texture from it. Dry those patches off now.


I like to build up these layers of gesso and texture and repeat it again at least once or more if required.


 I like to use different stamps too.


For the next layer I took two stencils, a number one and a mixed media design one and applied a mix of texture paste and gesso through them.


I dried the surface of the first layer of stencilling before applying the second layer so that it didn't get spoilt.


I still had a little of the texture mix left over so I used my finger to blend a little round some of the edges and give it a more cohesive feel.


Whilst I left it to dry I started to gather some more ephemera and a photo for my focal elements and I layered and glued them together ready to put on the pages.


To bring some depth into the background and the textures I wanted t spray neutral colours over the pages. I have lots of distress sprays that I rarely use these days so I decided to try out adding some media acrylics to a couple and see how I fared!!!! I began with Titan Buff in Antique Linen distress spray and tested it on some absorbent art paper. In the photo below the first smaller spray was just the ink, the second spray had some of the titan buff added and third spray had even more added. You can see the colour changed and became more milky by the third spray so I heat dried them and then sprinkled on some water, left it for a few seconds to soak in and then dried it of with paper kitchen towel. The antique linen ink being water based came out of all three of them so I need to do some more experiments here ......


.... but I went ahead and used the mixture and had some raw umber and burnt umber on my palette and a brush and water spray to hand to experiment with. I achieved what I wanted with colour pooling in the recesses of the stamped textures .......


..... and some subtle colour changes across the pages.


Now to finish it off. Add the collage, take a dark brown charcoal pencil and add shading around the two collage areas and then around the pages themselves and hey presto we're finished.


Thanks for stopping by to see what I have been creating in my new journal.


hugs Brenda xxx