Monday, 8 January 2018

Grungy Journal covers - Andy style - DecoArt Media Team

Welcome everyone - I was over on the DecoArt Media Design Team blog last year with this very grungy Andy Skinner style HeArtfelt journal. All the details can be seen over there and you can be transported if you click HERE.


To keep all my work in one place I have now added all the details below.

I made two cover panels using Andy's mega crackle technique (link to Andy's tutorial here) using DecoArt media fluid paints and mediums. Just look at the MEGA crackles that appeared.


On to the focal embellishing of the cover. I took a piece of card big enough to take the skull and dipped it in watery washes of sap green, titan buff and burnt umber drying between each layer.


I stamped the skull and just had enough room for the specimen plate as well.


Take a piece of greyboard cut to size to fit the journal panels and draw where the cut out skull and specimen plate will go. With a palette knife add some texture sand paste around the edges. Let it dry although it can be helped along with a heat gun.


Then paint over the whole piece with black gesso.


Now take a stiff bristled brush and dry brush with white gesso - you can see here where the stamped pieces will go ....


.... and the same with yellow iron oxide but keeping it to one edge all the way round.


Repeat with sap green and phthalo blue ....


.... and lastly some quinacridone gold.


Now for some random watery washes, the first is sap green mixed with transparent yellow iron oxide ....


...the second is burnt umber mixed with straight yellow oxide.


Next I turned my attention to the stamped pieces and added some watery quinacridone edges and painted a little inside the skull to help them blend in with the plaque. 


When they were dry I glued them to the plaque and gave it all a coat of ultra matte varnish.


Back to the mega crackle panels, I dabbled watery washes of the same three colours used on the stamped pieces and spritzed the areas with water before drying each colour separately.


I then made a dirty glaze to seal the surfaces using one of Andy's recipes - find it about 3/4 of the way through this video HERE.


At the same time I edged a quote chip with quinacridone gold and sealed it with the glaze.


I had a rust making session creating four nuts and bolts and  some rusty card to die-cut some decorative elements. I chose this one and gently rubbed over some lavish green metallic lustre.


Going back to the journal covers I overlapped and struck the spines together with redline tape and gave them a coat of white gesso. When it was dry I stamped the crackles using black archival ink and then repeated the steps of dabbled washes and dirty glaze (see above).
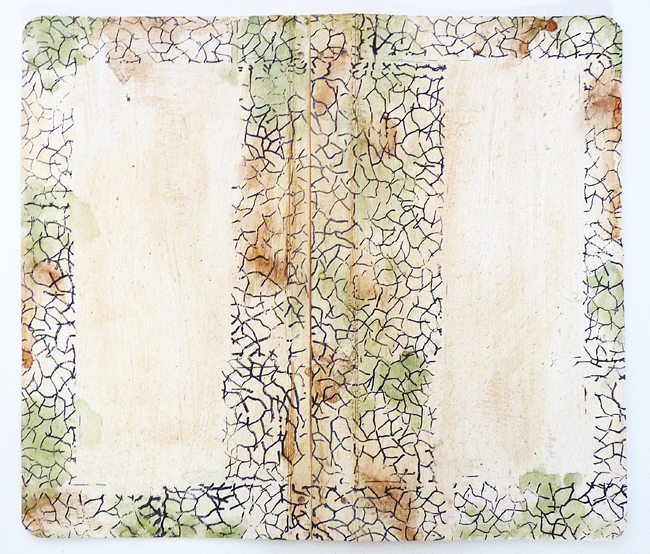

Sand the edges of the panels and ink them with ground espresso distress ink and adhere them to the covers and assemble the elements on the front cover of the journal.


Cut papers to create inside panels and also cut and score a thin one to cover the inside of the spine. Add elastic to hold page inserts.


Make up little 'booklets' of papers and pockets to tuck under the elastic.


Some of you will have seen that I am now a proud member of the Andy Skinner Creative Team and I'm looking forward to making samples with lots of his new products that will be coming out over the next few weeks. Stay Tuned.


hugs Brenda xxx


Products Used:
Media Fluid Acrylics Burnt Umber
Media Fluid Acrylics Sap Green
Media Fluid Acrylics Titan Buff
Media Fluid Acrylics Paynes Grey
Media Fluid Acrylics Quinacridone Gold
Media Fluid Acrylics Phthalo Blue
Media Fluid Acrylics Yellow Oxide
Media Fluid Acrylics Transparent Yellow Iron Oxide
Media Crackle Paint
Media Texture Sand Paste
Media Black Gesso
Media White Gesso
Media Ultra matte Varnish
Metallic Paint – Metallic Lustre Lavish Green
Americana – Weathered Wood


Supplies Used:
Assorted Brushes
300 gms White Cardstock
Strong double sided tape
A piece of greyboard
Andy Skinner Stampendous Skulldogery Stamp Set
Andy Skinner Andy Skinner Industrial Elements Bolts/Washers sheet
Items for embellishments
Journal and papers
A Quote Chip
Crackle stamp
Black archival ink


Thursday, 4 January 2018

Be you bravely Tag - Even if it Sucks project

I recently saw this photo on the Let's Be Creative VIP FB page and had had a similar thought in my mind - to try and create something small several times a week to keep my creativity bubbling away. I often get lost in the big projects and then have nothing to show for it because it's for a post in the future.


So having been getting my first DecoArt Mixed Media team project done for 2018 this is an off-shoot using up leftover paint and creating a small tag for today.


DecoArt Chalky Finish paints with a Prima stencil.


Translucent Media Acrylics, colours mixed with translucent white and a little bit of matte medium and blended over with a sponge.


An Andy Skinner stamp.


A Paper Doll, some tissue tape and small talk sticker quote ......


..... and there we have it.


I'm quite happy with this to get me started in 2018.

I thought I'd also show you one of my Christmas presents from Ken.


Yes it's a light studio with two enormous photo bulbs and lamps a fabulously huge box tent which at the moment is set up in the spare bedroom and oh boy I love it. What a difference in taking my blog photos, even on a grey day or at night time. A little bit of editing in Photoshop Elements and they're done.

Wishing you all a happy, healthy and creative New Year.

hugs Brenda xxx

Monday, 25 December 2017

Shabby Christmas Card - Holly - and Christmas Greetings

This was the second of my shabby seasonal stand up cards which has almost the same technique as the first one I made ( which you can find here if you missed it).


I did a make and take at Ministry of Mixology and created a shabby vintage card which you can see here. The boards were cut for me by Di at Tando Creative and I have been using to make a set of cards to put into the Pack House.


I dribbled and daubed some watery washes over the chalk paints to create some contrast and depth of colour.


I added Tim's easel die-cut as the stand .......


... and used this die-cut for the sentiment, cut from textured card like core'dinations, sanded and inked.


Well the big day has arrived, I hope it is one filled with love, happiness and some quiet peaceful moments for reflection.

**********************

My Christmas tree this year in the conservatory, I love it.


Ella, my 11 year old Granddaughter on stage at the Yvonne Arnaud theatre in Guildford in their pantomime for this year - Dick Whittington.


So proud of her.


And from me to you, with my family and Santa, I wish you a very 
Merry Christmas.


hugs Brenda xxx


Saturday, 23 December 2017

Abstract Christmas Art - DecoArt MMDT

AS my grandchildren said to me yesterday today is Christmas Eve Eve and I hope you are now ready for the festivities.

I have a Christmas canvas over on the DecoArt Mixed Media Blog  which originally started out as an experiment in abstract art and morphed into a Christmas canvas.

If you would like to see all the process steps and photos please pop on over when you have a minute to see how I brought this together.

Have a great weekend.

hugs Brenda xxx

Friday, 22 December 2017

Shabby Christmas Card - Santa's Wish

I have so enjoyed making this selection of cards with chalk paints, chipboard pieces and die-cut card. Others can be found by scrolling back (or clicking Reindeer Wish or Snowflake Noel) and you will see completely different designs but more or less the same technique to make them.


The backgrounds are painted with the DecoArt media acrylics ......


..... and the white is chalky finish paint stippled over. The sentiment is a Tim Holtz die.


I die cut an easel from mountboard using the Tim Holtz die and added it to the back to give it the support it needs to stand up.


My wish for Christmas is for a peaceful world where people live happily and in harmony together.

Only three more sleeps.

hugs Brenda xxx

Saturday, 16 December 2017

Shabby Christmas Card - Reindeer Wish

The fourth in the first series of shabby cards for the Packhouse, this time I used one of the large Reindeer from Tando Creative and some of their snowflakes with a die-cut border, stars and sentiment. I actually taught this card yesterday at Let's Be Creative and had a fabulous day full of fun, laughter, fabulous outcomes and festive cheer.


I really love this one as I really like the varied the background colours using the DecoArt media acrylics and chalky finish paints. They really stand out quite strongly on this card.


You can find a few more photos and details over on the Tando Blog today.

Have a fabulous weekend, only one more week or 10 more sleeps till the big day.

hugs Brenda xxx


Monday, 11 December 2017

Shabby Christmas card - Snowflake Noel

Following Andy Skinner's class at Ministry of Mixology where he used layers of chalk paint for the base layers I came home and tried out using those layers as the actual technique for a set of shabby stand up Christmas cards to put into the Pack House to see if they would sell. (Fingers crossed).


I used DecoArt Chalky Finish Legacy with a tiny amount of black and Everlasting for the two layers with some beautiful tando Creative snowflakes and some die-cut stars and a border and I also used the Tim Holtz Vintage Tidings sentiment words.
I'm not going to share the exact technique here but it might well come up in one of my Technique Tuesday posts that will return in the new year.


I love the very shabby, snowy effects ........


.... and the wintry feel to this card.


The sentiment has been die cut from coredinations card and sanded so that it is in keeping wth the overall effects.


A Tim Holtz easel die cut means this card can stand and be a piece of Christmas art in it's own right.


There are a few more details over on the Tando Creative blog and I've got another couple of designs coming up before the big day arrives.

I hope you're snug and warm at home if you've had the snow this past couple of days, I am on the Surrey/Hampshire border and apart from some sleet showers have not seen any of it. 

Take care and have a good week.

hugs Brenda xxx