Friday, 4 December 2015

A Vintage Christmas

It's the first Friday in December and we are now on the countdown to Christmas and this is the bit I love, getting the decorations out of the loft, father and son going to the forest to choose trees for our homes, granny and granddaughters baking Christmas flapjacks as part of the family traditions (which are being passed on), the buying and wrapping of presents and the house filled with lights. It's such a special time in the Brown households.

With all of this in mind I had great fun creating my contribution for Annie's challenge at A Vintage Journey, called 'A Vintage Christmas' which she describes as - 'Use your dies, stamps, rub ons- anything you choose to create a Vintage Christmas card, home decor piece or gift for someone special.' Well mine is a gift for our home and will be displayed on the sideboard with other special decorations over the Christmas period.


I had the idea of what I wanted this project to look like but it took me some time to choose specific images to fit on the sides of each side panel so I started by die-cutting and glittering four stars to have one on each side.


The first of the movers and shapers dies I used was the mini skate and I die-cut two of them and used gesso, silver paint and distress ink before making holes in them to sew the lacing mechanism and hanging a small bell from them.


Using one of Tim's duo snowflakes I painted it with bundled sage distress paint and spritzed it with water then dried it. I rubbed hickory smoke DI on the raised areas and then some glue sprinkling with rock candy distress glitter. The tidings token was painted with the bundled sage paint, rubbed off and edged with treasure copper whilst the die-cut 25 was gessoed, dabbed with forest moss distress stain and sprinkled with rock candy distress glitter.


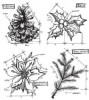
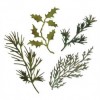
I love the look of the finished mini lantern which was rubbed with raw umber and silver decoart acrylic paint and edged with treasure gold. The little bands were cut from greyboard and painted with paynes grey acrylic paint. The Christmas muse token was painted with picket fence distress paint, rubbed with treasure gold and blended with ground espresso DI. The foliage was also altered with paints and alcohol inks.


The mini bells went through various layers of paints and crackle mediums before I was happy with them and I tied them together with another altered Christmas token and some ribbon.


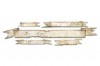
Here is a close up of the crackle effect on the box which was gessoed, painted with raw umber and given a coat of weathered wood crackle medium before being painted again with decoart lace chalk paint,


Here are the four sides once put together.


As always I carried on adding to it the next day and in the next photos you will see I added some snow details.


Don't you just love Tim's remnant rubs? They went onto the bells and the crackled glass bottle so easily.


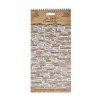
Here are the four panels once the whole block had been completed.


And all four of them together.


I hope we will see you over at a Vintage Journey this month with a Vintage Christmas themed project.

But just before I go I thought I would show you some of the photos from our family weekend at Longleat Centre Parcs. We had the most fabulous few days in our own winter wonderland even though the weather was damp and mild it didn't spoil the excitement and enjoyment.


Now to get my own winter wonderland sorted at home lol.

Have a wonderful weekend.

hugs Brenda xxx


Tuesday, 1 December 2015

Create a Scene for CVC

Welcome to December and today I thought I would share this winter shadow box for my DT contribution for Rachel's 'Create a Scene' theme, it was the project we made on the last workshop we held for the year back in early November.


I thoroughly enjoyed designing and teaching this box with all the techniques and 3d elements that are included.


If you look into the background you will see it is textured, crackled and glittered to create that wonderful icy look, even that beautiful regal stag was inked and covered with rock candy distress glitter to make him sparkle, albeit in a rather understated way.  Tim's sleigh die has been used to make a three dimensional carriage for the little collection of goodies inside and the snowflakes are also Tim's and they have been inked, given a coat of gesso and more distress glitter added to them.


You can see in the photo above that the frame has been layered and crackled and then distressed to give it an aged look. The bottle bruh trees have been sprayed, the trophy cup painted and filled with moss and a glittering star and a few other items added to build another little scene.


The stag's head was painted using decoart media fluid acrylic paints and some gesso added to create snow. He was mounted on a board which is a piece of greyboard die-cut and painted to look like a varnished piece of wood.


Now I would like it to snow over the Christmas holiday so that the grandchildren can have some fun on their toboggans and enjoy the winter as it should be enjoyed by youngsters. I know it's not so much fun for us oldies but I still feel the magic when the snow begins to fall, there is something so special when the world turns white.

Thanks for stopping by today.

Do pop over to the CVCC blog to see what other wonderful projects the team have come up with and have a great week.

hugs Brenda xxx 

Saturday, 28 November 2015

Vintage snowflakes

I seem to be using Tim's weathered winter snowflakes a lot this year, for this card I kept to a vintage neutral palette to start with but you can see it brightened somewhat as I went along.


I began with a Prima 6x6 life time collection paper pad and some scraps of patterned papers to create a simple collage on a background.


I scraped gesso over using a palette knife .....


... and when the gesso was dry I used coffee archival ink to stamp one of the weathered snowflakes.


Over that I brayered another layer of gesso to create a distressed look ....


.... and die cut one of Tim's layered snowflakes and ran it through the accompanying texture fade, I also cut all the snowflakes from the paper snowflakes thinlits set and punched one as well. I didn't use all of them but some of them to layer up to create the focus of the card. By smearing left over gesso and dipping the smaller ones in what was left I created a textured  background on them. They then got dipped in peacock feathers and twisted citron distress inks, finishing with dips in gathered twigs and hickory smoke.


After adding a little patina distress stickles I layered them and added to the card with some washi tape to add a little more interest .....


... a stamped sentiment and a small bow made from a strand of hessian.


Wishing you a happy weekend with some creative time set aside just for you.

hugs Brenda xxx

Wednesday, 25 November 2015

Snowflake Tinsel

Welcome to my blog and today I am sharing my second DT contribution to the Country View Challenges theme for November which is 'The colour Blue'.


My backgrounds started with the card being dipped into a blue mix of distress inks and brushos and dried. I took the gorgeous shabby snowflakes from Tim's Weathered Winter stamp set and covered them with blue distress inks direct from the pads. Don't forget to always start with your lighter blues and then the darker ones so you don't contaminate the lighter colours. I spritzed water into the air and wafted the snowflakes through it and then stamped onto the background, in most cases this gave me an even more distressed look as the snowflake edges bled into the background a bit. You can see no two look the same.


When perfectly dry I brayered over a thin layer of white gesso to make it look more like a snowy background.


I wanted a strong image as the focal point so I die-cut Tim's layered snowflake in a light blue card, and lightly brayered gesso again over the raised parts, dried it off and dipped it into broken china DI and dried then into faded jeans and dried it again.


I brayered over with the gesso again being careful to just touch the high points and sprinkled over some snowflake tinsel embossing powder. Once heated this gave me a beautiful sparkly effect and to make the snowflake pop and stand out more I blended ground espresso DI round the edges.


I adhered the snowflake onto the background with some natural fibre beneath it ........


.... added the words die-cut from Tim's holiday words script 2 set .......


... and then mounted onto some dark blue paper before adhering to the card.


I have prepped 9 of these with just the one completed but when I finds some time there will be quite a few more to add to my box and plenty of handmade cards to send to family and friends.

I hope your week is going well. Enjoy the run up to the weekend and I hope you find some quiet time for you in it somewhere.

hugs Brenda xxx


Monday, 23 November 2015

Poinsettia Blueprint

Good morning - I'm joining you with a Christmas card for Country View Crafts Project Blog that you can make quite quickly and add to your box. I am pleased to say I am getting a few done now and glad I have started as things seem to be getting manic with project deadlines and family life.


You can find all the details over at CVC and more photos to see how it came together.

Take care and have a great week.

hugs Brenda xxxx


Updated from CVC


The background was stamped using the sentiments from seasons silhouettes with embossing ink and heated with a sparkly white embossing powder. This was then selectively dipped in festive berries and mowed lawn distress inks.


Stamp the poinsettia twice cutting them out without the leaves on one. Dip the smaller part in festive berries, fired brick and abandoned coral distress inks. Put them together having blended the edges with your favourite brown distress ink then add a small amount of pinflair or collal glue gel to the middle and stick in some dried natural seeds to make them look like the berry centre.
I then dipped the lower piece in in pine needles and twisted citron and I just love the colour combination and blending that occurred.


Die-cut holiday greens holly using green paper and also dip that in twisted citron to get shade variations on the leaves and edge with ground espresso.


The banner was simply dipped several times in festive berries drying between each dip and seasonal chit chat words added.


I put it all together with some natural fibre behind the poinsettia.


I hope you like the brighter colours for me and a fairly simple card to make and get in the post.


Enjoy getting all your Christmas cards made, it won't be long till the big day now.

Thanks for stopping by.

hugs Brenda xxxx


Saturday, 21 November 2015

Snowflake Joy Recipe Christmas Card Series #3


Fill your Christmas Card Box - Pt 3

Three more cards for the Christmas box using designer paper and a few simple embellishments to create a sweet but quick card. The focus for this one was using older dies and stamps and a paper pad to have a ready made background.


Ingredients
Paper pack - Trimcraft Silent Night
Dies - spellbinders rectangles and ornate trim, movers and shapers oval, snowflake.
Stamps - Framelits Holiday Joy, Letter to Santa
Distress inks - ground espresso, bundled sage
Archival ink - watering can


Method
Cut background card and belly band border ink edges with ground espresso. Cut oval stamp with greenery and joy
Die-cut frame, ornate trim and snowflake from gold card .....


.... and assemble. I used small foam pads on the frame and thicker ones on the joy oval to create dimension and interest. I even experimented with turning the card on the side, it worked well although I couldn't fit the ornate trim on.


Some of my close friends are not into the vintage, grungy styles I like and this was a refreshing change to make for them. Three more for the box and minimum postage - yay. 


I hope you are enjoying the quick card series, please let me know if you use any as inspiration.

Take care.

hugs Brenda xxx