Showing posts with label mould. Show all posts

Sunday, 31 May 2020

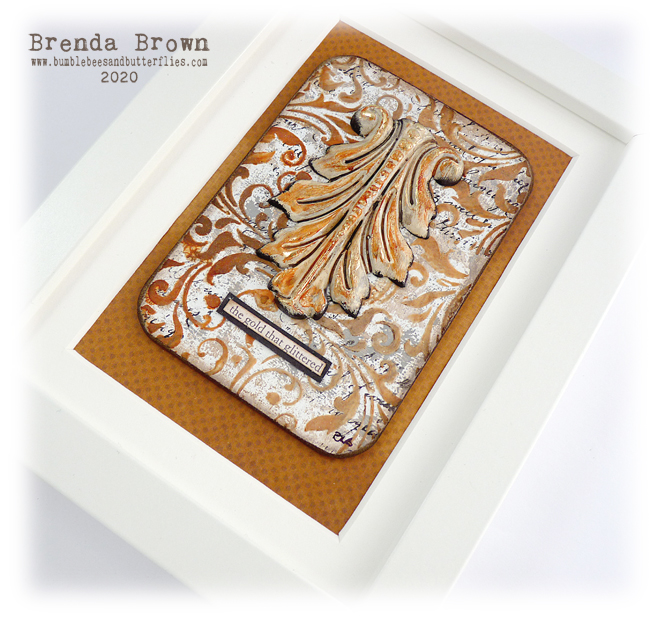
The Gold that Glittered - Media Tile

Inspired by Sid Dickens
Another media tile framed.


Process Steps
1. Seal the board with tinting base.
2. With a small brayer very lightly roll on burnt umber and white mixed together,; repeat with medium grey,
3. Stamp text.
4. Take white modeling paste and a drop of burnt umber mix a little together scrape through a small area of a stencil, repeat by mixing quin gold with the modeling paste and repeat by getting different shades each time you scrape through. If necessary dry the surface of the modeling paste before repeating in a different area of the tile.


5. Sand and distress the edges blending in brown distress inks.
6. Take the mould and seal it with gesso/tinting base or chalk paint. Drip some burnt umber and quinacridone gold mixed together into the channels.
7. Finger rub some quin gold over the raised areas.
8. Give wishes of paynes grey and quin gold.
9. With a small piece of sponge dab carbon black around the edges.


10. When dry finger rub some metal leaf size over the raised surfaces and leave to get tacky for at least 15 minutes before adding the gold foil.


11. Add the mould and some words and frame it.


Supplies from DecoArt
White Tinting Base
Media Fluid Acrylics - Burnt Umber, Medium Grey, Quinacridone Gold, Titanium White, Raw Umber, Paynes Grey, Carbon Black

Friday, 2 September 2016

Create inside a frame at AVJ

Wow it's the first Friday of the month and it just so happens that it's September - hey who stole the rest of the year away and especially the summer?
Anyway, it goes without saying that there's the most amazing post over at A Vintage Journey today with lots of inspiration to tempt you to join our new challenge called 'Create inside a frame'. Go read the details and hopefully you will join us.

I used a small 15 x 15 cm balsa wood type frame that is only £1 from the Range and although it is only little it took me days to get it to a point where I am now happy with it.


Process steps
1. Cut card to size to fit inside the frame.


2. Give the card a coat of gesso to seal it and when dry apply white modeling paste tinted with burnt umber through a stencil. Dry for a 30 secs to a minute (depending on thickness of paste) then spritz an embossing folder with water and press into it. Let it dry


3. Take a piece of card and emboss whth the same embossing folder. Scrape over some texture sand paste and dry. then give three separate layers - burnt umber, paynes grey and dripped raw umber. This will be cut up to form the frame.


4. I then played with lots of colours and layers both dry brushing and spritzing until I had something that looked quite Moroccan in style. To seal it and enhance the colours I gave it a coat of gloss varnish.


5. Take the frame, mix some black and white gesso and paint the frame with the grey that you've made. Then add washes of the same colours and some dry brushing that was used on the textured card.


6. Dry the frame and give it a coat of transparent crackle glaze.

7. Take the embossed card - drip titanium white and titan buff paints through the textures, dry and then dry brush with burnt umber.


8. Sand the edges, blend ground espresso distress inks around them and then spritz ground espresso on the mat with water and dip and dry the card. 


9. Take a couple of moulds, I used resin plaster for them, and paint with viridian, blue green light, transparent yellow iron oxide, titan buff, burnt umber and raw umber paints and also both paint and rub in champagne, iced espresso and lavish green metallic lustres.


10.  Collect together other embellishments and alter them using rusty and painty techniques so they fit in with the style you are creating.


11. Assemble and give everything a thin coat of matte varnish.


Rather different again for me isn't it but I love the way it turned out.


Have fun with the 'create inside a frame' challenge, I hope you will be able to join us over there and be in with a chance of winning a fabulous DecoArt prize.

Have a fabulous weekend.

hugs Brenda xxx


Enter your email address:


Delivered by FeedBurner

Monday, 26 March 2012

Sewing theme

Everyone who visits me knows I just adore anything with a sewing theme and this piece I loved playing with - I think it is very different for me. I actually made it some time ago but not had the time to blog it.


Can you see what the actual container is? Take a guess.

I have used a vintage dressmaking pattern, several clay moulds, fabrics and other embellishments to finish it off.

Not long before I finish work and then I will be able to visit you a bit more.

Take care.

hugs {brenda} xox


Photobucket

Sunday, 4 December 2011

Grandma's Sewing Room

Hello there. Welcome to another Sunday and a new Fashionable Stamping Challenge. Our entrants are showing us some of the most amazing art ........... we're definitely having to work hard to keep up with the superb quality.

Today we are asking you to show us some dressmaking, corsets and/or accessories on your work, and as most of you know this is one of my favourite themes. I have gone the altered art route and changed a wooden box shelf into Grandma's sewing room. Would it have been like this do you think?


I picked up some of these great box shelves at a carboot recently. It started life looking like this


so you can see the great change in it now.


I have given the wood numerous coats of gesso and white acrylic paint and finished off with picket fence crackle paint. It has been sanded down, edges exposed and inka gold applied over it to give it an even more shabby look.


The background is where I did most of my stamping, using stamps by Wendy Vecchi, Andy Skinner and Hampton Art. I printed the main shapes onto fabric, masked them off and added collage text and other stamps over them. I painted in the larger items using distress inks.


The table (made from Wendy Vecchi Art Parts) has miniatures on it and there are other bits and pieces strewn across the floor.  The wooden hanger is hooked to an old zipper that has been stuck to the ceiling. The set of rickety shelves I made from greyboard and painted, cutting fabric to go on them.


 I also used numerous moulds which I covered in Panpastels and then sprayed with 'spray and shine'.


 The frame has three dress forms all covered with tissue paper stamped with the TH Haberdashery set.


I hope you like my piece of altered art - please go over to the challenge blog to see the team's fabulous interpretations,

This is a great opportunity to make something very feminine and as long as you show us some stamping (not digis) you are in for a chance to win a great prize from Marina at Cottage Crafts.

I can't believe 3 weeks and we will be celebrating Christmas Day. I hope your preparations are gong well. I feel as though I have still got lots to do but I did get the living room decorated yesterday and we will get our trees next weekend.

Enjoy your day.

luv and hugs {brenda} xoxox

Challenges to have fun with -
Simon Says Stamp - Anything Goes
Stamps and Fun- Distressing
Sunday Stamper - Love and/or life    As this theme is a real love of mine does that count Hels?
Craft Your days away - buttons or bows
Photobucket

Friday, 22 July 2011

Shaped card for C4E

Shaped cards? That's not one of my usual things to do, but when it came up as a challenge theme this week for Crafts4Eternity I really had to put my thinking cap on. I have some scalloped edge cards, but I thought that would be cheating to use one of those. I don't have any of the grand nesties so the only thing I could think of was to cut a smaller shape and see how it went. I used a Go Create die - wavy frame #2.


So this is it. I found this gorgeous image at Bumble Buttons, a magical place for free vintage images, I cut it using the next size die down and then drew round it and cut out the blue mount. With some crystal stickles, one of my frozen charlotte doll moulds and a skirt, a shabby bow and a sentiment I was sorted.

Very simple, but I like that for a change. It is nice to create something that doesn't take me days, as many of my projects do.

Only one more week for me being a GD at C4E. It has been a great time with very enjoyable themes and a very relaxed atmosphere. See you next week with my last contribution and something much more up my street.

Have a very happy Friday and thanks for popping by.

Photobucketluv and hugs {brenda} xoxox