Thursday 29 May 2014

Tim’s tag for May

Oh my gosh, talk about cutting it fine again for getting my tag completed, but it’s just been manic this week after getting back off holiday last Friday and then we are off early in the morning to Ramsgate and Margate for a wedding and catching up with lots of family.
P1170078
But here it is, my completed tag, true to Tim’s one, but a little bit me too.
P1170087
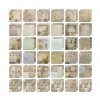
I painted the muse token with picket fence distress paint and rubbed over the highlights with copper treasure gold (note to self get a black one).
P1170082
I was really pleased the way the ShadowPress folder worked with the black archival ink, I thought it was going to go everywhere, but the raised areas are prominent enough to take the ink without it going over the rest of the plastic.
P1170083
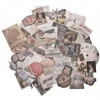
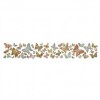
Love the butterfly over the frame, great idea. I used the Wallflower stash papers for all the elements except the butterfly which came from another Tim set, but this was a small left over piece I could use up.
P1170085
Thanks Tim for another great tag this month and one I loved doing as I often work with small elements.
All the details can be found on Tim’s blog if you haven’t yet seen them but you only have till Saturday to enter so time to get your skates on and follow in my footsteps.

I had a great class with a group of lovely ladies on Wednesday and we played with (sorry I taught) Ranger Dylusions ink sprays all day, learning new techniques and finishing a double page spread in their new journals before they went home. Thanks for a great day Joan, Judith, Jane and Christine, I will try and blog some pictures next week, but I must go and pack for this early start in the morning.

Have a great weekend and I will be back on Sunday with a project for the new challenge at Country View Crafts. See you then. Oh and don't forget a new challenge also starts at A Vintage Journey tomorrow, the lovely Jenny will be hosting and what a great theme for the next fortnight, you'll love it.

hugs Brenda xxxx

Monday 26 May 2014

Nautical Blueprint for Country View Crafts

This is my latest project for Country View Crafts using my new Nautical Blueprints stamps. I made this card before I went away on holiday and gave it to the friends we stayed with as a thank you card, we certainly did have some good times together.
P1170015
I would love it if you could pop over to Country View Crafts Updates blog to see how I made it. These stamps are fabulous.
As this is a sea themed card I thought I would share some of the wonderful coastal photos we took while we were in Hawaii. The islands are all volcanic but they have a variety of white and black sand beaches and much of the coastline is rugged and steep. The colours are vivid and piercing especially when the sun is shining through the water.


A huge thank you to everyone who continued to comment on my scheduled posts while I was away. I am very aware that I have some catching up to do and will be out visiting blogs this week.
Thanks for dropping by and taking a peek at my card and my photos.
Maybe I will also see you at Country View Crafts Update blog as well.
hugs Brenda

Friday 23 May 2014

More Finn Journal pages

My pages today show eldest granddaughter Becca, so I thought I would do a quick catch-up for those who supported Becca and I when she was diagnosed with Crohn's disease and was in hospital for most of the autumn 2012 up until the beginning of December. Thank you to you all who sent cards and good wishes, you know who you are and Becca and I were so pleased to to have that support.  She had two six hour operations and some of her intestines taken out at that time and had to wait a year to see what the next steps would be. Since then she has had another operation and has made a remarkable recovery and we are so pleased with the progress she has made. She is now at 6th form college and doing well with her studies and will hopefully be learning to drive soon. Oh my gosh where do the years go?

So onto the project.
P1140758
The base of the pages are kraft card, covered with text paper and gesso.
P1140760
Cut and torn strips of card, canvas and tissue tape etc. were added and then gesso through some masks.
P1140761
Next I added lace, tapes and trims and glued in the photos.
P1140762
I added staples, gems and embellishments …..
P1140763
….. and cut more small pieces and scraps and tucked into places.
P1140766
I stamped with archival and then splattered with tea …..
P1140765
… and walnut crystal ink.
P1140764
I used a soft pencil to add lines around the photos etc. and added chit-chat stickers and some of my own journaling words.

Although this is a scheduled post I will be home today from my holiday, I will let you know what we did and saw sometime soon.

Have a great weekend.

hugs {brenda} x0x

Tuesday 20 May 2014

Using re-inkers for a journal page background

Just a short post from me today.
When I did the journalling workshop in Wales I taught this technique to the group. I think it creates a gorgeous background.
I used watercolour paper and then stuck the finished piece into my large Dylusions Journal.
P1160810
Draw some blobs and circles using distress re-inkers, I used wild honey, tumbled glass and aged mahogany and the end of a paintbrush. Spray with water and let the colours run and merge together then blot off.
P1160811
Spray Dylusions white linen through a mask and heat dry immediately as the white absorbs the colours of the inks underneath. Mine did but you can just see a part of the pattern to the left of the word ‘dressform’.
Draw black circles on the background with a drawing pen.
Stamp an image on card and paint with distress inks then adhere it to the background.
P1160812
Add your journalling around the circle.
(I saw this on the web sometime ago and didn’t keep a link – if you know who I can credit for the technique please let me know and I will update this).
Have a great week.

hugs Brenda xx

Friday 16 May 2014

Believe – Positivity Journal

When Astrid came to stay I told her about my little positivity journal – it was she who had inspired it – and while we were out shopping together I bought a couple of new stamps, this gorgeous long birdcage is one of them and it wasn't long before I had a play.
P1160940
Background – distress paints peeled paint, broken china and picket fence daubed onto the page and spritzed with water then dried. Next I sprayed with some goosebumps (haven’t used that for ages) dried it with a heatgun and then sprayed with white linen dylusions ink and spritzed with water, this gave a fabulous mottled effect when dry.
P1160932
To create more depth I used Dyan Reaveley's basic backgrounds alphabet stamp with cornflower blue archival
P1160934
and then my favourite Tim latticework stencil with broken china DI.
P1160936
Now I needed some contrast so I used another new stamp
P1160938
– handwritten script by inkylicious to give some more depth and added a few scraps of tissue tape.
P1160940a
The bird cage was stamped onto some card on which I’d used the wrinkle free technique and added some distress paints over it and I drew some white pen lines to add highlights. This was cut out edged with walnut stain and adhered to the page along with some left over trellis framework die-cut piece.
P1160941
To finish I added the quote, some small remnant rubs which I distressed with my new Prima distressing tool and then some black soot marker and DI around the focal image to create shadow and help it stand out more on the page.
P1160944
I am really quite pleased the way this turned out, the goosebumps created real texture and then the masks and text stamps created depth and interest over the mottled colours.

I shall enjoy doing more of these pages when I get home as they don’t take too long but they keep you focussed and involved allowing Mr Mojo to do his job.

I didn’t get to create a Creative Guide project this week for the new challenge ‘All about Him’ chosen by Anne, but I hope you will be able to pop over to ‘A Vintage Journey’ see what the other amazing Creative Guides have made for you and to get some wonderful inspiration for cards and items for the men in our lives.

Have a wonderful weekend whatever you have planned.

hugs Brenda xxx

Tuesday 13 May 2014

Small Practice Journal Cover

Having started my new practice journal – which really is just for playing in and having fun on a small scale – I decided it needed a decent cover on it.
P1160845
So there are no mistakes in my journal – as I said 'just for fun'.
P1160830
I began by covering a piece of card with printed tissue paper and blending some clear gel through a mask.
P1160833
When dry I added some distress stains and wiped it over gently with a baby wipe to remove any stains from the structure gel.
P1160838
Next I blended DI through the mask to begin to get the layered look.
P1160841
And I stamped over that with picket fence distress paint which added even more interest.
P1160842
I wanted to add some dimension and as the tissue paper had lovely roses on it I thought I would stick to the flower theme. The leaves were daubed with peeled paint distress paint and then several different coloured distress stains
P1160844
I edged the leaves with walnut stain DI.
.P1160847
I had these hand made flowers in my drawer so I coloured them up a bit and added a small bought flower to make it an odd number…..
P1160846
…. and found some odd letters to make my quote – the original said ‘There are no mistakes only lessons’, but I didn't want to add the last bit.
P1160849
So there it is finished. I rather like the brighter colours and the depth created by the layers of inking etc..
P1160852
I found this little quote about keeping notes and it fits me exactly only I don’t think my brain can even retain information for three minutes lol.

  Now to get down to some more little playtimes for the inside pages.

Hope things are all well with you.

hugs Brenda xx

Friday 9 May 2014

Mini Journal Pages

Since teaching the Journal Day last month with the Technicraft Club in Wales, I have been spending just short amounts of time creating some pages, just as warm ups and time fillers really and it’s so nice to get some small works of art done in a short time – there’s something gratifying in that.
P1160824
This first page was made by scraping some paint over the page and leaving to dry – which really didn’t take very long. I stamped the harlequins and text over in black archival – heat dried it – then scraped some white acrylic paint over the top.
P1160826
I have some hearts printed out in various colours so I tore one of those and adhered to the page and a stamped butterfly. I have various computer generated quotes so I added one that fitted the images then added some remnant rubs. To finish I added shadow around areas and stamped a small bottle with distress ink. Done!
P1160827
This page started off with distress stains rubbed over and then spread with a damp babywipe. I sprayed some white linen dylusions ink over the top and heat dried it. The focal image is one of my altered playing cards created with book paper, tissue tape and some stamping which I followed through onto the background. An off-cut of patterned paper aged with walnut stain DI, some text stamping and hey presto complete.
P1160829
My altered playing cards have been inspired by taking part in the 52 card pick up on line course by Stephanie Ackerman.

I hope you get to create small pieces of art sometimes and keep them in a journal. It’s lovely to go back over what you have made and be refreshed and re-invigorated to create something different again. I now have my large dylusions journal, my collage journal, this small practice journal, a small ideas journal and a learning journal I take with me when I attend workshops. Lots here to keep me going then.

Keep well and have fun.

hugs Brenda xx

Wednesday 7 May 2014

Life is Good – Wallflower card for CVC

My last card in the Wallflower collection that I have been making. Using one sheet of 12 x 12 paper from the Tim Holtz Wallflower paper stash to make 4 cards – bargain. If you have missed the others you can find them here, here and here on my blog or fuller versions here, here, and here on the Country View Crafts Updates blog.
P1160541

Other products I have used -
Vintage flowers from the Thrift Shop Ephemera pack
Stamps – simple sayings, shabby french
Butterfly Frenzy strip die
Movers and Shapers butterfly die
Raffia made into a bow (my supplies)
Distress Inks – victorian velvet, aged mahogany, scattered straw, walnut stain
Distress crackle paint – rock candy

I would love it if you popped over to see the full details and more photos on the Country View Crafts Updates blog.

Thanks as always for stopping by and taking a look at what I have been creating.

I hope you are having a good week and getting some creative time.

hugs Brenda xx