Showing posts with label CVC Workshop. Show all posts

Monday, 7 July 2025

Are you an Artist or a Crafter? What is a Sketchbook? Do people who make crafty projects keep a sketchbook?

Who is a craft artist?

To me it is someone who creates handmade projects using a whole variety of substrates and media to bring something beautifully creative and artistic to the finished product. Do you love to design and make individual and imaginative works of art to show on social media, sell to people, to give away to your friends or just to keep for yourself? Well, a sketchbook is a fantastic place to keep lots of trials, experiments and practice pieces and is used by many of us who are not just pure artists (in the sense of those who are learning formal art), but also those of us who consider ourselves to be crafty individuals who are also artistic.

A sketchbook is called a sketchbook because it was specifically designed for sketching which generally refers to making rough, unfinished drawings or quick studies, but the term "sketchbook" implies a space for experimentation, practice, and the development of ideas, rather than finished, polished artwork. I have many such books that I have been calling journals but actually I keep many of my mixed media designs in them, crafty, vintage and shabby panels and sketches or paintings that I have created over the years. Why have I called them journals? Well, I really don’t know, but maybe it’s because I didn’t see myself as an 'artist', many people think that craft, in the sense of papercrafts and similar projects, is not art. If they’re not, then what are they?

Here's a Google AI overview answer to my question ‘Can papercraft and similar projects be called art?

Yes, papercraft and similar projects can be considered art. The distinction between "art" and "craft" is subjective and often blurred, but many papercraft forms involve creative expression, aesthetic appeal, and skilled execution, which are all characteristics associated with art. 

Recently a very good friend told me I should not be calling some of my sketches 'doodles', they are sketches or drawings she said and told me that I shouldn’t shy away of seeing myself as an artist. So, you know what? She is absolutely right! I think so many of us crafty artists feel the same. As I said in the opening paragraph we are people who create handmade projects using a whole variety of substrates and media to bring something beautifully creative and artistic to the finished product, therefore we are artists.


With that in mind I have started a sketchbook to bring together lots of ideas, ‘practice’ pieces in drawing, painting and collage using all the materials and tools that I use in my day to day creative craft and arty sessions in my studio (actually it’s a small bedroom lol).

If you are interested in keeping a crafty/artistic sketchbook that will contain some of your trials, some finished pieces and some collections of other media like die-cuts, stamped and coloured images with other snippets then maybe my ‘Creative Sketchbooking’ workshop is for you. The day will be packed with 6 mini projects that will be linked together with practice and learning opportunities to include a little sketching, some tracing and what I call painterly water colouring which is using acrylic paints in the same ways that we can use watercolour paints.  Along with the die-cuts, snippets and colour swatches these will all come together under the theme of Butterflies, Bees and Moths to bring 2 x A4 pages to sketchbook life.

Some people like to stamp...


Some people like to draw ...


Some people like to play with colour ...


Some people like to create collage, and use snippets, design and get involved with details, use die-cuts ....


There is something for everyone. 

The workshop is on Thursday 17th July (One space only) and Friday 18th July 2025 (several spaces available) and can be booked online at Country View Crafts . It will be held at Country View Crafts headquarters which is –

Country View Crafts
Country View
6 Wrestlingworth Road
Potton
Sandy
Bedfordshire
SG19 2DP
United Kingdom

Susan is the owner and has this amazing online and physical shop where she sells a huge variety of products from a large number of different brands. She is a one-man band running her business but her customer service is second to none and on many occasions orders that have been placed before 3 pm have arrived on my doorstep the very next morning. (Thanks to Royal Mail as well).

Workshops are actually held in her shop, normally the maximum is 12 and she provides a free lunch.

If you are interested I am a teacher by trade, I no longer teach in education, I am retired, but I love doing workshops. I pack the day full so that it caters for those who are less confident and experienced to those who are more confident and accomplished, wherever possible there are opportunities for you to personalise the content and further develop your own ideas and reflect on your own creative journey and interests. I am there to help, support and advise to the best of my abilities and many of my workshop participants are returners who keep coming back to enjoy making the projects I bring. Why not come along for the day to see what we offer and have some fun and learning as well.


Social media links –

Me - https://www.facebook.com/Bumblebutterfly/

My Blog - http://www.bumblebeesandbutterflies.com/

Me - https://www.instagram.com/bumblebutterfly/

Country View Crafts Shop – https://www.countryviewcrafts.co.uk/index.asp

Country View Crafts Workshops - https://www.facebook.com/groups/380480706160675

Sunday, 15 December 2024

Taking a workshop with Zoe Hillman - Advent board

 Advent and grungy project 

On the 1st December I was at Country View Crafts to attend Zoe's first workshop. She had designed this board using some of the Tim Holtz Christmas idea-ology range and also some printed pieces she had made.

Here is my version of her original.


It was a great day and I loved being able to sit and make something beautiful like this. 


Sunday, 8 December 2024

CVC Workshop Winter Wonderland Project


Some photos from my Winter Wonderland workshop at Country View Crafts - 30th November 2024


My 2024 Christmas workshop project for Country View Crafts - I so love making 3D boards and they are very popular. I used lots of Tim Holtz products and loved adding the ledge and blocks to help create this wintry landscape. The natural elements helped add a wonderful cold, icy, wintry feel.

1.    Paint all the small wooden pieces with 1 coat of white gesso – dry. Repeat with a coat of white acrylic paint – include the base of the silver trees. Sand the edges of the cubes and blend the exposed edges with a dark brown DI to give a shabby effect. Repeat the effect randomly on the corners and odd parts of the ledge and frame.

2. Paint the large board with a coat of gesso to seal it and dry. (no paint)

Take speckles or snowy effect stencil and texture paste (I used distress texture paste matte) add very sparingly mostly round the edges of the top 2/3 of the board and dry.

Take tumbled glass and broken china Dis and speckled egg and iced spruce DO. (or any sky blue colours). Create puddles and dabble them over, spritz, drip and dry. Take white acrylic paint and lightly brayer over the top, the white will hit the top of some of the snow droplets but also create lighter areas on the board that you can rub in with your finger to create cloud effects. Dry.  If you want to add more of the blues, repeat puddles and daub with a brush, the texture paste soaks up some of the blue watery ink and also the inks lay and puddle between the snow droplets. When it’s dry scrape the texture paste through the speckles/snow stencil to add more white snowy texture through it. Again, dry it. KEEP BOTTOM THIRD OF THE BOARD CLEAN.

Moving to the bottom third of the board use the tumbled glass DI and Iced Spruce DO to make puddles of colour. With a paint brush daub a light layer over the board and add a little silver paint into it, let it all move around a lot in your hand and dry it. Splatter with water and watch some rings appear. Dry and take iced spruce distress ink and a chosen small chosen stencil (I used the mini version of Festive THS029) to create background for the seed heads.

Glue the ledge on at this point. The top of the ledge is 22 cms from the top f the board. Put to one side to dry.


3 Take the four, silver, die-cut trees, glue shapes back-to-back, offset slightly, and don’t worry if some of the white shows through, it actually looks like snow. Glue a gold star to the top of each one.

Take the gold sparkly row of fir trees, Cut the sides to fit the wooden panel and use a palette knife to add a small amount of snowtex to both the gold and silver trees using a palette knife. Put aside to dry.


4 Take the white card panel. Blend silver paint through a star stencil and dry it. Blend tumbled glass (light blue) DI over the surface. Sparingly rub some micro glaze randomly over the surface and gently buff off excess. Blend broken china (mid blue) over the surface. Splatter water droplets on, leave for about 30 seconds and the blot off with a paper towel and dry. You have created a mottled sky with snow falling in the background. Sand the edges and then blend a dark blue and then a dark brown distress ink round. Splatter it, the main board, the panel and the row of fir trees with some white paint. Dry the card panel, then adhere this to the wooden panel to create a frame. Paint glue round three sides of the frame (not the bottom one) and sprinkle rock candy glitter over it. Put aside to dry.


5 Take the round circle, lightly blend antique linen over the surface. Spritz with water, blot & dry. Spritz, blot & dry a second time. Place the moon mask over the top & blend antique linen distress oxide through it to create the texture of the moon. Dry it. Use a very fine paint brush to add glue over the oxide and dip into rock candy glitter.


6 Take the ribbon spritz it with water. Make a little puddle of tumbled glass, dip and dry. Repeat with a watery puddle of salty ocean. Make it into a bow.


7. Make up the double snowflake. Use small amounts of brown and white paints to colour the deer.


Now all pieces are prepped it’s time to assemble the project. Start by adding the star background frame on the ledge and adhere the two blocks either side of it. Glue on the silver icicles strip, the moon, gold stars, silver snowflakes. Adhere the white dried flowers and bundle of sticks on the blocks. Use a glue gun to add the seed head spray, bow and bells. Glue on the silver trees then use snow-tex on the ledge and adhere the decorative pieces – I always add glue to the areas that are going to sit in the ‘snow’. Add the Winter Wonderland title. Lay this flat in a box to carry it home.


Thursday, 11 April 2024

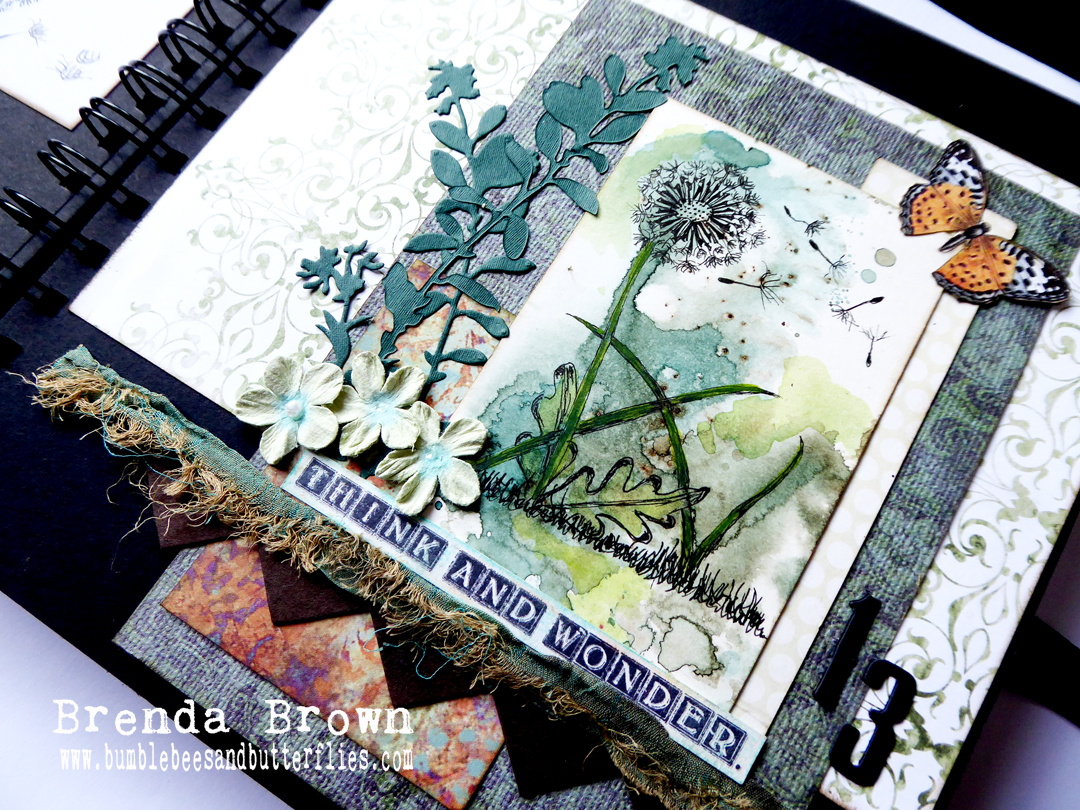
Flower Collage Dandelion Seed Head

 Hand Drawn Flower displayed with collage

Workshop Country View Crafts 2023 Deconstruct - Reconstruct


I am playing catch up keeping a record here of the samples I created for my workshop last year.


This is Flower Collage 1, it is actually a Dandelion seed head (clock).

We started  by looking at photos of the Dandelion clock and carefully unpicked the structure of the flower drawing each piece of it individually.


I then sketched and inked up the picture....


... and made a distress ink background and drew it again and painted in the leaves using the distress inks.


Finally I created the collage around it and displayed it in a black paper art book.


I have several more of these to come as I made lots of samples to give the participants a variety of collages as inspiration for putting theirs together.


xxx

Monday, 18 March 2019

My first workshop this year at Country View Crafts

I had a fabulous workshop at Country View Crafts last weekend teaching techniques and sharing tips with a fabulous group of people who attended. This was the project - a shadowbox filled with textures, images and ideas.


I enjoyed putting this together as well as teaching the process steps and taking centre stage are two od the Tim Holtz Cottontail die cuts, created in a mixed media style.


Participants also put together a collage layer for a rusted frame to sit over using ephemera and papers ....


.... and I demonstrated quick and easy way to add watercolouring using decoart media fluid acrylic paints.


I love the entomology bugs which come as stamps and dies and these are fabulous for adding interest with the layers ......


.... including one hiding in the wildflower foliage.


The crackle background worked perfectly using a stencil with the decoart media crackle paste and then layers of watery acrylic paint washes.


I have a post over on the CVC project blog today that also shares these photos and also a video of the projects made on the day.

Thanks for stopping by.

hugs Brenda xxx

Supplies
DecoArt media fluid acrylics - quinacridone gold, paynes grey, raw umber, sap green and cobalt turquoise hue, green gold, cerulean blue, viridian, pyrrole red, titan buff, raw umber, titanium white, translucent white, cobalt teal, burnt umber, yellow oxide .
DecoArt mediums - media white gesso, media white crackle paste, decou-page sealer, texture sand paste, matte medium.
DecoArt - Glazing medium
Tim Holtz dies- Cottontails, Wildflower stems #1 and #2, mini 3d border
Tim Holtz - entomology stamps and dies

Wednesday, 31 October 2018

Happy Halloween

I have a post over on the Tando blog today sharing photos of a recent workshop I taught at Country View Crafts of a Halloween Triptych I originally made last year for the DecoArt Mixed Media blog.


If you would like to see how a fabulous group interpreted my boards please pop over here to the Tando Creative blog to see the results.

I hope today is full of treats and no tricks.

hugs Brenda xxx


Backward, turn backward,
Time, in your flight
make me a child again
just for to-night!

Elizabeth Akers Allen

Monday, 12 September 2016

New workshop for CVC

Double Trouble

I am calling the next workshop for Country View Crafts "Double Trouble" purely and simply because we will be making two projects this time round.


I love this frame as it is more understated than other projects I do, with less depth and layers but enough for it to still look interesting and I think this simplicity is a great contrast to the recesses and embellishments and allow them to pop out more.


Each of the recesses is made up in the same way but with different designs and embellishments.


The fall foliage thinlits create gorgeous leaves .....


.... that sit on the textured background beautifully.


This has a harvest feel to it as well as a thanksgiving one too.


The shrine is a fun make to finish off the day creating lots of texture .....


... adding Tim Holtz embellishments and die-cuts .......


... and creating a niche with elements that will be perfect for a Halloween display.


There are more details over on the Country View Crafts Project Blog and the workshop is available to book on the Country View Crafts website. Click on the highlighted words and you will be transported over to both places to find out more details.

I thought we were going to have a few warm days this week but today has started cloudy and considerably cooler than I thought, I hope the next few days will be better.

have a great week.

hugs Brenda xxx