Showing posts with label foil. Show all posts

Sunday, 31 May 2020

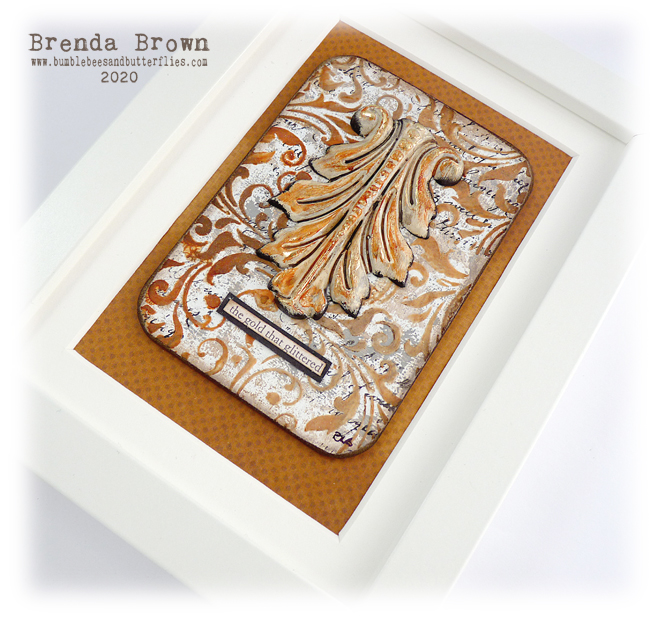
The Gold that Glittered - Media Tile

Inspired by Sid Dickens
Another media tile framed.


Process Steps
1. Seal the board with tinting base.
2. With a small brayer very lightly roll on burnt umber and white mixed together,; repeat with medium grey,
3. Stamp text.
4. Take white modeling paste and a drop of burnt umber mix a little together scrape through a small area of a stencil, repeat by mixing quin gold with the modeling paste and repeat by getting different shades each time you scrape through. If necessary dry the surface of the modeling paste before repeating in a different area of the tile.


5. Sand and distress the edges blending in brown distress inks.
6. Take the mould and seal it with gesso/tinting base or chalk paint. Drip some burnt umber and quinacridone gold mixed together into the channels.
7. Finger rub some quin gold over the raised areas.
8. Give wishes of paynes grey and quin gold.
9. With a small piece of sponge dab carbon black around the edges.


10. When dry finger rub some metal leaf size over the raised surfaces and leave to get tacky for at least 15 minutes before adding the gold foil.


11. Add the mould and some words and frame it.


Supplies from DecoArt
White Tinting Base
Media Fluid Acrylics - Burnt Umber, Medium Grey, Quinacridone Gold, Titanium White, Raw Umber, Paynes Grey, Carbon Black

Thursday, 19 March 2020

DecoArt Mixed Media Team Project for March

I have a post going live over on the DecoArt Mixed Media Blog today which came about because I had my arm in a sling and needed to not move it around much. So the three media boards I chose to use all had the same techniques and layers as did the butterflies but the small deviations with stamps and positioning created enough variety of interest to the eye.

To see the full tutorial please pop over to the DecoArt blog where it is listed with lots of process steps and photos.

xxx

Thursday, 13 December 2018

12 Days of Christma Cards #3

Collage Christmas cards 3

More Christmas cards made for The Packhouse and some for crafty friends maybe!


The backgrounds were made by dipping the card into watery paints and dried then I added some strips of wash and tissue tapes and gently dry brushed some gesso over them to tone them down a bit.


I sifted through my paper dolls to choose the ones I wanted ......


..... and I gathered up some off-cuts of patterned papers and built up some collage layers for the dolls to sit on. At this point I added some stitching
.

When making cards I try to get a bit of a production line going and use different colour variations.


Before I glued the collage layers on the card I rubbed an embossing ink pad lightly round the edges. sprinkled on sticky embossing powder and when heated I laid foil papers on to create more interest and add some shiny focal areas. unfortunately they don't show up well in the photos.
 

I had some spare snowflakes so I inked the edges and added them to the cards with some festive words.


These are for sale at The Packhouse, Runfold near Farnham in my selling space.


Many thanks for your continuing support and ...

xxx


Sunday, 31 January 2016

Mix It Up with Tim

 
For his tags of 2016 Tim is re-mixing two of his tag techniques from previous years to bring us new ways of using them. I am sure this will be a blast bringing together old and new ideas to create something completely different and to start us off he has given us chalkboard and industrious metal to work with.


So as Tim has mixed things up a bit so have I.


As you can see I changed the colours and I used pine needles distress paint for my industrial pieces but I also added a wash of black distress paint over the top to get that industrial patina look.


I also reversed the chalk and background colours making my coffee cup more in keeping with the real ones you might get in mine and Tim & Mario's favorite coffee shop. Still using chalks I even added a bit of green colouring to the cup and although not totally clear int his picture the tiny cog has been altered with alcohol ink and copper treasure gold.


The background is Tim's mesh stamp and produced with the chalkboard technique the same as the coffee cup.The word band was first coloured with pine needles distress paint and then antique linen (using Tim's technique for distressing the bands) and I also added some treasure copper to the edges.


I changed the normal string or ribbon for some hessian ribbon painted with the pine needles and black wash and then stapled on with the mini attacher.


Yay, having missed the last three tags at the end of 2015 due to the pressure of additional workloads I now find I am catching up and getting back into the swing of my own schedule at last. Thank goodness as I have so missed joining in. Thanks Tim for a great start to the new year with the technique remix and I am now going to go and link to the January post on your blog.


Have a great Sunday and I'll see you tomorrow with my DT sample for the beginning of the new challenge at Country View Challenges.

Happy crafting.

hugs Brenda xxx

Thursday, 1 January 2015

Happy New Year plaque

Foil tape plaque for 2015

Happy New Year I hope you will have a happy, healthy and peaceful 2015 and be able to enjoy some regular inspiration time to create and make beautiful art.

I am starting the year with something special I made to hang in the dining room for our new years eve party - a plaque to hang over the mirror with the year on it..


Process steps

Cut 4 ATC size pieces of card (2 ½  x 3 ½  ins) covered with foil tape and run each one through  the texture trades numbers set for 2015. I've used a mixture of Ranger foil and DIY foil.


Cut more pieces of card covered in the foil tape and run through a selection of embossing folders. And adhere the patterned pieces of foiled card patchwork style to an A4+ sized piece of greyboard.


Add strips of the foil tape to join some of the edges and to seal the edges.


Use metal tools to edge each piece and to add any other decorative features you might want to add,


Paint over the whole piece with black soot distress paint and before it’s dry wipe over with kitchen towel to take most of it off leaving black paint in the crevices.


Next take the numbers and again paint and wipe away the excess, let them dry.


Blend alcohol inks over, then drip some blending solution over then recessed areas and wipe off. I was aiming to get reddy numbers and a brown background. Drip the browns in the recessed areas and again drip a couple of drops of blending solution on. Pick them up and move them around so that the colours move across the foil. When dry I got a very small paint brush, the black soot DP, the brown alcohol inks and blending solution. I painted some black around the numbers to help them stand out more and then just played with the other supplies until I was happy with the blending and colourisation.


The numbers were mounted onto brown card and adhered to the board and a spread a little teak wood alcohol ink around the edges to frame it (just like I would with vintage photo or walnut stain distress ink on my papercraft projects). Add some snaps with the Cropodile and some wire to hang it by.


It was dark by the time I got to take this photo so it looks completely different to the one above it, but here it is hanging on the mirror, you can just see the reflection of some Christmas lights.

Thank you for all your support and wonderful comments last year, I so appreciate them particularly when my teaching schedule got so busy and I couldn't get round to see you all as well. But new year and fresh start, I am definitely going to try and do better.


We keep moving forward, opening new doors, and doing new things, because we're curious and curiosity keeps leading us down new paths.


Enjoy your creative moments.

hugs Brenda xxx