Thursday 31 July 2014

Scrapping in my Journal

Hi Everyone I am really pleased to guesting again at PaperArtsy tonight. When Darcy asked me a few weeks ago what I was making I told her it would be something around ‘scrapping in my journal’ as I wanted to use the really zingy colours in the Fresco Finish paints range with photographs. This is not quite how I imagined it then, but I am pleased with the fabulous bright background mixed with my more normal vintage style. I think it has worked really well. Before anyone asks lol, the photo on the left is me (looks as though I was about 3-4) and the photo on the right is my Mum holding me.
Please be warned this is a long post, but I hope you will stay with me to the end.
P1180001

So to start off cut two pieces of card and using low tack tape secured them together. Cover both pages with a layer of gesso to seal the card.
P1170903
Rub London Bus, Tango and Zesty Zing Fresco Finish paints over the page with a few mists of water and a wet babywipe to help blend them. Heat dry.
P1170904
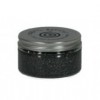
Then spray with Goosebumps to create some texture and again heat dry. I then  used two of my spare spray bottles and mixed a watery London Bus in one and the other with Zesty Zing and sprayed over the pages heat drying between each colour. Lastly I finishes with a couple of sprays of White Linen Dylusions ink spray.
P1170905
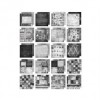
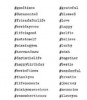
To add some interest to the pages I stamped with the Hot Picks 1301EZ set using three different brown archival inks.
P1170906
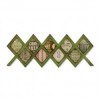
I began to collect together some strips of hessian, canvas, card, and lace to create some textures and I also die-cut some of the PaperArtsy Chatsworth paper using the Tim Holtz Courtyard frameworks die. I used the Fresco Finish paints again but this time I watered them down in little mister bottles and sprayed them over to blend the colours.
P1170908
And so the pages started to take shape.
I painted and sprayed the die cuts and pieces of card to make the sentiments.
P1170973
I cut out some butterflies that I have ready downloaded in a small box and I pulled out some rusted elements to see how they would fit in.
P1170972
I also sprayed some strips of embossed canvas and gathered some other pieces and a snippet of hessian together..
P1170971
The colour of the frameworks didn’t fit in the way I thought they would so I sprayed them with watered down FF chocolate paint as well.
P1170984

Next came the assembling and I started with some tissue tapes before gluing the strips down and adding the photos.
P1170992
For the penultimate stage I added some dylusions ink to the London Bus spray to deepen it a bit more and covered the photos, spraying in three areas and heat drying. I then added some splatters of walnut crystal ink. Of course I got carried away here and forgot to take any more photos till nearly the end.
P1170999
Lastly I cut the pages apart, cropodiled the holes at the right places and finished with some chatty words that I make up myself and print out.
P1170994P1170995P1170997P1170998
The pages are now inserted into my growing ‘scrapping’ journal.
P1180002
I love how the vintage meets journal style, it’s a bright and busy background but the vintage seems to be right at home too.

Thanks for staying with me through a long post.

I thought I would also share with you tonight that it is Ken's birthday today and I want to wish him many happy returns of the day, but it is also a very special day in that we got married 40 years ago on his birthday in 1974 and I am just wondering where have all those years gone???? Needless to say we are looking forward to many more happy years together creating memories.

Take care.

hugs Brenda xx

Tuesday 29 July 2014

Tim Tag for July

I love seahorses and the summer so this tag was a delight to make and I followed Tim’s guidelines almost to a T.
You can find Tim's instructions on his blog with a list of supplies he used and a photo step by step - I am linking this up to his July post.
P1180077
So we have the beautiful crackled seahorse and the fabulous watery and bubbly background ........
P1180068
...... the distressed jute ribbon, the spring greenery with a completely new lease of life …….
P1180076
…. and the textured sand to hold the sand dollar and starfish.
P1180077
Another of my favourites – well I think they all are actually, not sure how you would choose a bestie, just depends on the moment in time doesn’t it?

It’s going to be a great week this week in the Brown household, Thursday will be the special day, with things happening Friday and Saturday …… ooh tease I know, oh and I’m guesting as well on Thursday at PaperArtsy, so keep an eye out for another post from me then.

In the meantime have a great week yourself and hopefully some creative fun too.

hugs brenda xxxx

Monday 28 July 2014

What if? Tag using Tim Holtz products

Happy Monday everyone, I hope you have had a great weekend.
Over at the Country View Crafts Project Blog I have a tag today for you using some stamps and paper from Tim Holtz.

Here are some of the elements I gathered together to use on my tag.
P1170387

I'd love it if you have the time to pop over to the Project Blog to see more details and the finished tag 

Have a great week ahead and enjoy whatever you have planned to do.

hugs Brenda xx

Friday 25 July 2014

Just Stain It at A Vintage Journey

Wow another trip finished and time to start the next leg of the journey and Jenny is challenging us to Stain It. her brief is – ‘Distress Stains are the best way of getting your favourite Distress Ink colours in liquid form. That makes them ideal for staining flat surfaces/edges and crackled surfaces, painting, dripping, splatting, and so much more. Show us what you can do with your Distress Stains’.

I love the versatility of the distress stains and had fun making another masterboard background for this project and it's the second journal cover from me this week.
P1170701
This is a sketchbook journal, you know the ones you can buy for around £2.99 in The Works or The Range.
P1170644
I covered a long piece of greyboard with gesso and when dry I rubbed over the distress stains, wiping them away and blending them with a wet babywipe. This gave me a light coloured base on which to do the next step.
P1170573
The wrinkle free technique. I sprayed water, dipped and dried several layers until I was happy with the overall effects.
P1170610
I had covered a spare piece of greyboard with the gesso and mopped up the inks left on my mat before die-cutting the Artful Arrows. I dipped these in walnut stain and gathered twigs distress stains and dried them before adding a layer of clear distress crackle paint.
P1170577
P1170602
Whilst the arrows were drying I added some crackle paste through Tim's chevron and arrows layering stencils and heat dried it, which produced some crackles but I had kept it quite thin so they don’t show up as much as I thought they would.
P1170619
Once the crackle paint was dry on the arrows I dabbed some distress stains in a few areas and wiped them off again bringing some colour back into them.
P1170642
I added a few pieces of tissue tape and the arrows then splattered, sprayed with water and dripped stains onto the board until I was happy with the result. I finished off with die-cut letters for my saying, a spray of sealer and a chit chat sticker under the filmstrip.
P1170634
Thanks Jenny for the challenge and I have only used distress stains for all the colouring. I think the bit I like most are the arrows with the shattered stains effects on them.
P1170632
I hope you will have time to join us at A Vintage Journey before the challenge finishes and please pop over to see the amazing projects designed and created by the talented Creative Guides, there is just so much inspiration to see.
P1170696
Have a happy Friday, a wonderful weekend and some creative fun.

hugs Brenda xxx

Tuesday 22 July 2014

Journal cover using a masterboard.

Today it’s my turn to present a piece of work for the Country View Project Blog.

Do you remember the masterboard I made for the challenge blog at the beginning of the month? Well I decided to use part of it to make a cover for a small journal. You can see the full tutorial of how to make the board HERE.

Here are a couple of sneak peeks of the journal cover.

P1170403

P1170404

The fun in making your own covers is knowing that no-one will ever have one exactly the same (even me lol). This one though went to a friend for her birthday.

If you haven’t joined in the challenge yet, perhaps you'd like to get out your stencils and have a go at making a journal or notebook cover for yourself and then show it to us on the challenge blog.

Have fun with whatever you are making this week.

hugs Brenda xxx

Thursday 17 July 2014

Stencil It (2) for Country View Crafts

My second sample for the Stencil It challenge at CVC is a tag with stencil stamping.
P1170376
It also has some texture and collage elements.
P1170383
It would be great if you have time to pop over to see my post today at Country View Challenges to see further details and to enter the challenge if you haven’t already. There is still plenty of time, so pop over to the Challenge post as well to check out the details.

I hope you are having a creative week.

hugs Brenda xxx

Monday 14 July 2014

The Chemist – using papers and Frantage

I keep telling myself I have got to use up some of these paper stacks that are sitting on a shelf and never seem to get any smaller. So I challenged myself to make a card using the ‘Laboratorie’ papers by Tim Holtz.
This is what I came up with.


I chose the pieces to cut out including a piece of the lattice framework die and picked up a ruler already cut out from another pack and started to put them together as I was designing the layout. I knew it needed something to provide more interest rather than just edging the elements with ink so I got out the Frantage box and used some aged gold and even more of the aged silver embossing enamels.
P1170881 P1170878 P1170882
The silver embossing enamel did the trick and provided not just the interest I wanted but added to the laboratory feel.
P1170888
Three of the science jar/cylinders edged with silver.
P1170887
And the scientist himself. He fits nicely with the Simon Says Monday Challenge - About A Face, so I'll wander over and enter him there.
P1170886
Lastly a hashtag sentiment and done.

Those of you who follow me on Facebook will know I love it when the Farnborough airshow comes round, the planes fly over my house as we are almost under the flight path and I get so excited when the fast jets are displaying and let out the throttle over the rooftop. Last week all the planes came in and I was able to watch their practice displays from my workroom, the window faces the runway. The trade show starts today and runs till Friday and then next weekend is the public days. I will be going in with the family on Saturday to see the static stands and watch the displays by being directly underneath them. So I shall be watching them all week from my vantage point at the window or in the garden. Here’s a photo of the Airbus 380 coming across my rooftop last week. The open window is my workroom.
10th A380 f
Here's one of the F18 displaying over the garden ……
8th 3 F18
…. and the Vulcan
11th Vulcan 1
I could go on with lots more ……. but I’ll leave you with this quote for today.

When everything seems to be going against you, remember that the airplane takes off against the wind, not with it.
Henry Ford

Have a great week.

hugs Brenda xx