Showing posts with label Decoart. Show all posts

Thursday, 13 November 2025

Glittery Christmas Bauble

 Using glitter for Country View Crafts challenge

This is my first inspiration project for our Country View Crafts November Challenge, with the theme of ‘Fireworks' - use glitter or embossing powder to make your project 'sparkle’ hosted by our lovely Cassie.

I attended the amazing InkC retreat recently where the workshops included so many amazing projects and I am sharing my finished Christmas bauble that our very own fabulous Susan Seabert taught on the sunday evening. We had a huge collection of napkins to choose from to create a decoupage background and then I added snowtex and glitter. The blue snowflakes caught my eye almost immediately and I love the finished effects.

Process Steps

Paint the bauble with gesso to seal it and give a white surface Dry and then seal.
Pull the snowflakes out of the napkin by painting water around the image first which allows you to tear images with a rough edging. This ensures there are no straight cuts left when the image has been adhered to the bauble. I used the decoupage glue which is a sealer as well.
Leave the bauble to dry. Then using a coffeestirreror brush add snowtex around the images. Leave it to dry again.
Use the decoupage to cover the top half of the bauble and add the glitter. Leave to dry.
Repeat with the bottom half.


Supplies

Bauble and napkin supplied by Susan.

Gesso, sealer and glue (I used Decoart's Decou-page), glitter - distress rock candy


Thursday, 21 March 2024

Mad March Hare or a sweet Spring bunny 2 for Country View Crafts

 Mad March Hare or a sweet Spring Bunny? 


This is my second inspirational project for Country View Crafts March theme.
I do love making a piece of home decor especially for special occasions, so this has been added to my Easter display box.


Cut Tim Holtz Mr Rabbit die, prime with white gesso then pounce grey acrylic paint over it.

Take modelling paste and pounce over and dry.

Add some rusty looking areas and paint in an eye.

Add a circular top to a wooden box and gesso it all.
Scrape gesso over all areas with a palette knife and dry.
Use Scorched Timber, Walnut Stain, Hickory Smoke and Black Soot distress watercolor pencils to create drips and drops on the surfaces.

Use the tiny Tim Holtz Sidekick Order 'Springtime' pack of dies to cut the little rabbit from a scorched timber distress oxide background and the butterflies I cut from a leftover piece of distressed painty background. Add them to the box with some greenery from the Holiday Greens and Festive Gatherings dies.


I added moss and natural elements to the little nest I stuck the rabbit to.....


..... and I stuck this to a base and added more moss and sticks.

I have placed this piece of decor under a cloche to form part of an Easter display in my dining room.

Here is a shabby metal rabbit I have that gave me the inspiration for this project.


xxx


Supplies - products and brands from Country View Crafts

Tim Holtz Mr Rabbit die
https://www.countryviewcrafts.co.uk/bigz-bigz-l--bigz-xl-dies-156-c.asp

DecoArt white gesso and white modelling paste.
https://www.countryviewcrafts.co.uk/decoart-mixed-media-enhancers-850-c.asp
 
DecoArt dark grey and quinacridone gold acrylic paint,
https://www.countryviewcrafts.co.uk/decoart-mixed-media-fluid-acrylics-848-c.asp
 
Tim Holtz distress ink scorched timber.
https://www.countryviewcrafts.co.uk/tim-holtz-distress-ink--re-inkers-103-c.asp

Tim Holtz distress oxide scorched timber.
https://www.countryviewcrafts.co.uk/tim-holtz-distress-oxide-ink-pads--reinkers-1049-c.asp

Tim Holtz idea-ology salvaged rabbits.https://www.countryviewcrafts.co.uk/tim-holtz-idea-ology-102-c.asp

Tim Holtz Sidekick Order 'Springtime' pack of dies. (Retired)

Tim Holtz Sizzix Holiday Greens
https://www.countryviewcrafts.co.uk/661597---sizzix-thinlits-die---11pk---holiday-greens-mini-by-tim-holtz-152420-p.asp

Tim Holtz Sizzix Festive Gatherings
https://www.countryviewcrafts.co.uk/666333---sizzix-thinlits-die-set-6pk---festive-gatherings-by-tim-holtz-171111-p.asp

Cosmic Shimmer glue
https://www.countryviewcrafts.co.uk/cosmic-shimmer---glues-fluffy-stuff--accents-1522-c.asp
 

Tuesday, 16 June 2020

Antique enamelled bottle and media tile

Framed media tile.
Hold on tight to your dreams.


Process steps

Take a greyboard die-cut bottle and paint a coat of raw umber over the whole surface and dry.
Next paint it with tinting base but leave the edges almost dry brushed so that the brown paint underneath shows through in some places. Dry.
Poke two small holes through which you can thread the wire to tie the test tube to it.
Press the whole bottle into an embossing ink pad and cover with clear embossing powder, heat and leave to cool then give it a second coat. Sand the edges and rub brown distress ik round them.


Take the test tube apply some clear crackle glaze and leave to dry.

Paint a coat of tinting base over the media board tile and when it's dry using a palette knife used horizontal to the surface, scrape a very light coat of gesso over to create some random texture.


Alter the wildflowers and stems with some paint and archival inks. I tend to rub some paint light over the surface and when dry dip them in more watery paints and finish by rubbing archival inks around the flower parts.


Mix watery wash of pink, spread a little over your craft mat and dip the tile base  in and dry. Repeat several times mixing different shades of the pink. (I used pyrrole red, titan buff and titanium white). Splatter a little burnt umber.
Sand the edges and rub some brown distress ink and seal with a coat of soft touch varnish 

The test tube should now be ready for a couple of coats of both raw umber and white antiquing creams rubbing them with a dry cloth between each layer. Then secure it to the die-cut bottle with some rusty wire.


Assemble the parts and add to a frame.


DecoArt Products
Media Fluid Acrylics - Raw Umber, Pyrrole Red, Titan Buff and Titanium White
Mediums - Tinting Base, Clear Crackle Glaze, White Gesso, Soft Touch Varnish


A new take on my antique enamelled number plates using my DecoArt paints. This is an update to my original post which can be found here from the 19th September 2015. It inspired the layers for the die-cut bottle.

Monday, 8 June 2020

Revisiting old techniques - Scraped Gesso Layer

I've devised a number of techniques and layer combinations using acrylic paints over the years and I am returning to them for inspiration and to document them on media boards as a resource.


This one - Scraped Geso Layer - I taught at Ministry of Mixology in April 2019.

Process steps
1. Seal substrate with a layer of gesso.
2. Tear and add some tissue tape.
3. Dip in watery colour/s and dry.
4. Stamp text and/or numbers using black archival ink.
5. Scrape gesso randomly and lightly over the surface using a palette knife keeping it flat.
6. Splatter using leftover watery paint.
7. Create a dark frame firstly dabbling and spritzing some watery burnt umber mixed with quinacridone gold - dry.


8. Mix neat quinacridone gold with paynes grey and slide the brush around the very edge and dry.


xxx


Sunday, 31 May 2020

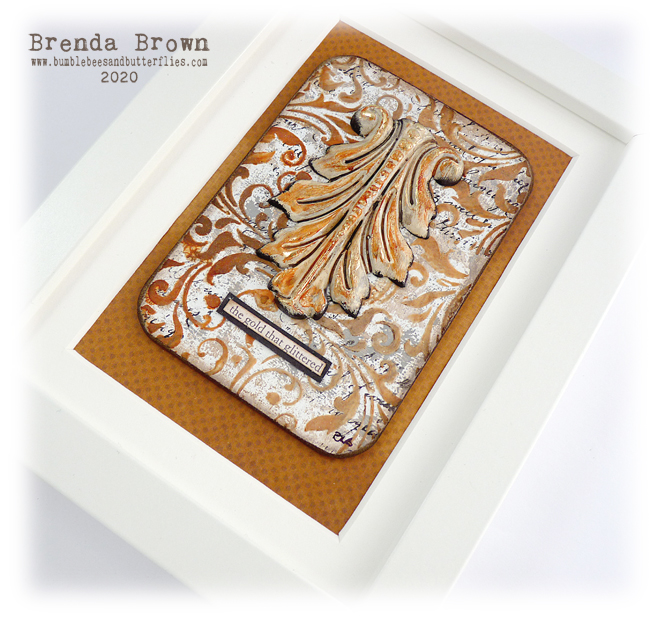
The Gold that Glittered - Media Tile

Inspired by Sid Dickens
Another media tile framed.


Process Steps
1. Seal the board with tinting base.
2. With a small brayer very lightly roll on burnt umber and white mixed together,; repeat with medium grey,
3. Stamp text.
4. Take white modeling paste and a drop of burnt umber mix a little together scrape through a small area of a stencil, repeat by mixing quin gold with the modeling paste and repeat by getting different shades each time you scrape through. If necessary dry the surface of the modeling paste before repeating in a different area of the tile.


5. Sand and distress the edges blending in brown distress inks.
6. Take the mould and seal it with gesso/tinting base or chalk paint. Drip some burnt umber and quinacridone gold mixed together into the channels.
7. Finger rub some quin gold over the raised areas.
8. Give wishes of paynes grey and quin gold.
9. With a small piece of sponge dab carbon black around the edges.


10. When dry finger rub some metal leaf size over the raised surfaces and leave to get tacky for at least 15 minutes before adding the gold foil.


11. Add the mould and some words and frame it.


Supplies from DecoArt
White Tinting Base
Media Fluid Acrylics - Burnt Umber, Medium Grey, Quinacridone Gold, Titanium White, Raw Umber, Paynes Grey, Carbon Black

Wednesday, 27 May 2020

Revisiting old techniques - Blended acrylics

I originally discovered this blending technique when making and experimenting with the blending tool and my decoart media acrylic paints for a tag for AVJ and then I used it for an experimental post for the DecoArt Media Team blog. I am revisiting this technique again as I create a board for my resource box of techniques.


Process steps
Firstly scrape gesso over the surface of the tag and dry. It is fine to create a little texture here.

Step 1 Use a blending tool and foam, choose a light colour acrylic paint (Titan Buff). Taking a small amount and some glazing medium, blend from the craft mat onto the tag, just like you would do with distress inks. Rub with dry kitchen towel and or wetwipe to get effects you like.

Step 2 - Buff the surface with a soft cloth.

Step 3 - Repeat steps 1 and 2 with a couple more colours, deepening them towards the edges Cobalt Blue Hue, Transparent Yellow Iron Oxide, Burnt Umber.


Step 4 - Very lightly stamp flourish/texture/pattern and text stamps using a similar colour to the background to get and light and almost monochrome effect with them. (archival peat moss).


Step 5 - Blend some darker colours around the edges of the tag as in steps 1 and 2 and very lightly splatter with them.


Step 6 - Dabble raw umber, paynes grey. quin gold at the very edge to create a timeworn vintage look.
I used a greyboad media tile and sanded the edges and blended in ground espresso distress ink.


Optional - You will see from the panels on the DecoArt post I also painted in the swirls and made the stamping more evident than in the AVJ tag.


xxx


Friday, 15 May 2020

More 'Lockdown' creative time

Thank you to Alison (Words and Pictures) and Nikki (Addicted to Art) for another fabulous creative and chatty session on Sunday. We all worked on our journals with me creating a panel to add to a collage in my vintage journal.
I have to say having a couple of crafting buddies who ca get together in this way gives us a very therapeutic window of time in this pandemic lockdown and provides us with an opportunity to catch up and enjoy just being with other people we know and love.


The background panel started with a layer of tinting base scraped across a piece of card with some washes of burnt sienna, raw umber, paynes grey and titan buff and dried before adding the stars. These were created with one of Tim's shifter stencils and the above colours as well as quinacridone gold, raw sienna. burnt umber, carbon black, titanium white and pyrrole red. I used a small blending tool and foam to layer the colours through randomly.


I started collecting some pieces together to begin the collage .....


...... working just on the panel to begin with. 


When I was happy with that I then brought together more oddments to build the page collage. All of the bits are from snippet boxes I keep, both of papers, words, fabrics and die-cuts. I love using up leftovers in this way.


If you have a moment please pop over to see the fabulous designs by my lovely intrenet companions.

Nikki

Alison


xxx