Monday, 13 August 2018

Tando - Anything Goes - Acrylic Pour - Give Away

For my 'Anything Goes' sample over at the Tando Creative blog I have used one of the pieces from my first ever experiments with the new DecoArt Pouring Medium.
There are some videos available to see on the DecoArt blogs here, here and here and of course google or search acrylic pours and/or look on youtube for ideas and help with techniques.

Process Steps

I chose my colours ....


.... and mixed them with the pouring medium. I then carefully tipped them into one cup to make a 'dirty pour'.


I tipped it upside down on the substrate.


This was the result. I decided it was rather sea like so that became my theme.


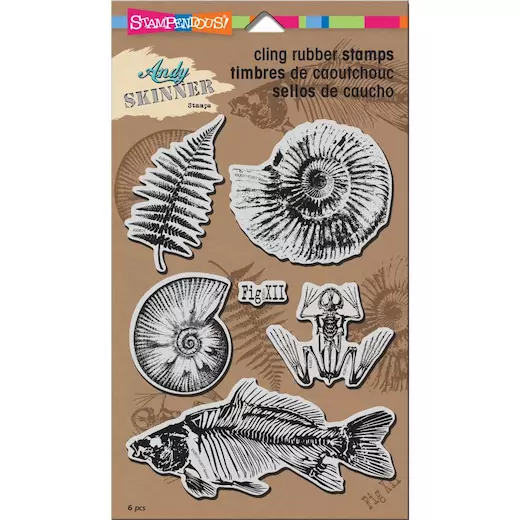
Next I stamped and masked the bottom of the tag using some Andy Skinner stamps  (Fossils) ...


... and added a little colour using the media fluids and a little tinting base.


I found a painty scrap of card and stamped the gorgeous octopus from France Papillon's Illusionary Artists Creepers and Crawlers set and added some white paint spots then gave it a wash of paynes grey.


It was here I decided to test out the clear modeling paste and the faux encaustic look and scraped some over the top of the tag and embedded the octopus into it. I also added some small flat backed glass cabochons. (sorry photos went missing).
I had used distress ink to edge the jelly fish and I love how it moves with the wet modeling paste to create a sort of shadow around the creature.


I added some remnant rubs and I carved the word 'sea' with a pencil then inked it with a black posca pen. I could have given this another coat of the modeling paste here but decided to leave it as it is. So with a painted vintage brad and some baker's twine it finally came together.


The creature looks suspended over the background which is precisely the look I wanted.


I'm really pleased with the look again of this acrylic pour and faux encaustic piece of art. 
What do you think?


Before I go ...............

Thanks to the lovely people at DecoArt I have a set of the fabulous Fossils stamps to give away.

Leave a comment below and you will be entered into the random org draw. The closing date is Saturday 1st September at midday BST and the winner will be announced on Monday 3rd September.
Good luck.


xxx


Friday, 10 August 2018

Peace - Media Board

This panel stated life as a sample for the Stitches Trade show back in February. I used DecoArt media paints and mediums with some of Andy Skinner's stamps including the new Gothic Grunge set.


Process steps
1.      Seal with tinting base.
2.      With a plastic card scrape small amounts of cadmium orange, diarylide yellow, pyrrole red, titan buff, titanium white across the substrate, first in one direction then in the other.
3.      Using the same colours plus raw umber use two different stencils and blend and bump them to create different tones of pattern across the background. (Tando small dots and swirl)
4.      Dribble the leftover paints top to bottom and dry between colours.
5.      Add some cobalt teal to titan buff and repeat step 4.


6.      Take a small piece of card and monoprint with titan buff and titanium 
 white and watch the card pull off onto the substrate.
7.      With a palette knife scrape some white crackle paste around the edges  of the board.


8.      When dry rub some teal antiquing cream into it and rub of again.
9.      Stamp using titan buff, raw umber and pyrrole red stamp some text across the background.
10.  Stamp arch onto tissue paper and adhere to the background and add some remnant rub words.
11.  Seal with a coat of satin varnish.


Now I have used it to make a small handbound sketch/watercolour book. For speed and efficacy I added some patterned paper to another board and sealed it with the satin varnish.


Having bound the pages using a coptic stitch so the book will lie flat when it is being used I bound the spine with white tape and glued the first and last pages to the inside covers.


This is now ready to go in my shop space.


Keep the creativity in your HeART.


Monday, 6 August 2018

Faux encaustic with die cuts and chipboard inclusions

I've been playing with lots of different types of inclusions to go into the faux encaustic process I have devised. Here I have tissue wrap, die-cuts, chipboard, ephemera, stamping and asemic writing in permanent pen.


I sealed a media board with gesso, blended titan buff, titanium white, paynes grey and quinacridone gold with a sponge to create a light mottled layer then added the paynes grey and quin gold as deeper colours both by rubbing them in with my finger and by spritzing with water, letting them  move around and drying them. I then adhered a piece of tissue wrap and sealed it with decoupage sealer.


Next I layered a coat of decoart clear modeling paste and grabbed some bits from a leftovers pot on my desk to stick into it and add as inclusions. It's quite an eclectic mix as you can see. I smoothed out the paste with my palette knife and left it to dry.


Then I stamped in black archival and did some asemic writing using a black sharpie pen.


I have to say the writing was a little journaling at the same time as this brought back memories of being in Paris 4 or 5 years ago.


Time to give this a second coat of the modeling paste and leave to dry overnight.


When dry splatter with titanium white watery paint, add a significant word and give it the third and last layer of modeling paste.


I think I'll tone down the splatters next time, these seem to look rather bright in the photos, they're not quite so prominent in real life.


I love the varied tones of color in this piece and the way the tissue wrap has really faded into the background


I hope you have been getting lots of ideas from the series of faux encaustic projects I have been creating and are having a go at your own. Please let me know if you do.

Thanks for being a pARTicipant in my creative journey.


Friday, 3 August 2018

How can you resist at AVJ - Bloom and Grow

Today our lovely Teamie Amanda takes the chair hosting the new challenge at A Vintage Journey. How can you resist it?  A couple of times a year I am asked to do a craft session with a group of lovely ladies and this last time we made a canvas board using DecoArt Media paints and mediums. The focal image is an old wood mounted stamp.


Take the canvas board and a piece of sponge and blend gesso over the board until it is smooth and covered.
Repeat with the small greyboard piece.
Add a tiny dot of sap green, 2 drops of titan buff and three dots of titanium white to your foil palette.
Take a piece of sponge and a babywipe and blend the colours over the canvas board until you get a light mottled effect background – waft it to dry. Scrape decoupage randomly over with plastic card, not too thickly and put one side to dry.

Stamp the flower with embossing ink on the small panel and clear heat emboss. 


When cool rub quin magenta with finger over the flower head and around the edge and sap green on the leaves and around them just to give a strong colour to the outline. Leave it to fully dry. It looks very messy at this point - but don't panic.


Rub the colours off of the flower with baby wipe and dry kitchen towel.


Take a piece of sponge and blend over sap green, cerulean blue, titan buff and titanium white creating darker layers to the outside and a lighter layer in the middle. Sponge up to the outside of the embossed image. If you need to create some shadow around the flower use distress inks and a small brush with water to blend around it. Finish by using titan buff on the scrubby side of the sponge to get light splatter effect. This is the panel I demoed at the workshop.


Add the sentiment.


Take a piece of sponge and a babywipe and blend the green and blue colours over the canvas board until you get a darker effect on the background, keep wiping back and adding more until you are happy with the darker contrast over the light. Leave to dry then splatter with some vintage mixed pink (quin magenta, white and burnt umber) and almost immediately lightly lay a dry piece of kitchen roll over the top to take out some of the colour.
Stamp second generation text with watering can archival ink.


Distress and ink the edges lightly. Glue the panel to the board, add the words and adhere the flowers.


The spray is made up of all shop bought flowers (sorry Jennie) and the different sizes are all easy to come buy. I always buy when I see them so I have a variety in a tub ready to use.


Add a Tim Holtz easel to the back.


I had a group of 10 ladies at the workshop and only one uses acrylic paint at home. They all made one of these in 2 hours, I had gessoed all the boards and stamped and embossed the flowers for them but they did all the rest. Just wish I had been able to get some photos.


This is my sample of how I have used a resist technique but if you have a minute pop over to the blog post at a Vintage Journey to see all the wonderful and inspirational samples and ideas for using resist from the team.

Follow your HeArt.


Monday, 30 July 2018

Entomology board for Country View Crafts

You love them or you hate them, all those bugs in the garden but they're totally safe when stamped on a project. I have an easel board over on the CVC project blog today created with the Entomology set of stamps by Tim Holtz and my faux encaustic technique.


If you can spare a moment to pop over and see how it all came together I would love to see you there.

Thanks for stopping by here.


Updated from CVC

I got the bug for this set of stamps - please excuse the pun lol, but the little creatures called to me to use them in a project so here is an easel board and yes my faux encaustic technique again.


Cut a piece of thin greyboard and adhere a piece of designer paper - mine is from the Tim Holtz Correspondence set - using the decoupage glue and seal the top with it too. When dry mix watery media fluid acrylics in three colours and dip, drip and dry random pools of colour and heat dry between each layer so the colours don't mix and produce mud.


Next mix some watery gesso and repeat the technique again.


Stamp three of the bugs - I used Tim's stamp platform and so glad I did as I was able to give it a second stamping to get very clear and sharp images.


I used the same colour paints I had in front of me to mix blends to paint the bugs and I adhered a plate name for each of them. (See my freebies page located just under the blog header to download for you to use).


I applied a thin coat of DecoArt clear modeling paste and left it overnight to dry.


I took some white gesso and transparent yellow iron oxide media fluid acrylic and blended them together to get a very light yellow colour and with blending foam I stenciled using one of Tim's mini stencils. This began to create some depth and interest. I also added a little text stamping using the gorgeous text from the Etymology set.
I also made a watery wash with raw umber fluid acrylic and dribbled and dried some round the sides and I distressed the edges and painted them with the left overs.I splattered a white gesso/raw umber mix covering the insects to begin with so they got barely any on them. I got so involved in the process I forgot to take a photo here.
I finished with a thicker layer of the clear modeling paste.


You can see how the layers are creating some depth.


To help bring the bugs nearer to the surface again and be more prominent I drew round them and added a little of the detail with a permanent black pen and added some asemic writing in white a also a white remnant rub. To encapsulate it all and seal it I gave it another thin layer of the clear modeling paste.


To create the simple background on the canvas board I simply took phthalo green blue, transparent yellow iron oxide, titan buff, titanium white and burnt umber and blended over with a baby wipe. As areas dried off I kept adding more colour and rubbing some away with the babywipe until I had a mottled effect.


Next with a small brayer I rolled on a little of the titanium white around the edges (remember the panel will sit over the centre). You could also add some very light text stamping if you wished, but I didn't want to detract from the central panel being the main focal point.


Create a 'dirty' wash (I use different colours according to how I want it to look) I used burnt umber, raw umber and titan buff to keep it light in colour - I didn't want a really dark one. I also just finger painted and added some darker areas on a few of the edges. If the brown comes out too dark you can always rub it back with a wet wipe even after it has dried for a while.


Finish by adding an easel to the back .....


... and you're ready to send it to someone special either as a gift or add a sentiment as a special easel card.