Saturday, 1 September 2012

UPA RAQ - Off to Collage

You can tell it's the first of the month, so much to show you this weekend and this is my second post for today.


Glue Book for Unruly PaperArts.

A glue book is whatever you want it to be, but generally it is a 'sketchbook' for mixed media work. It invariably includes glue and can be about practise runs, just letting your creative expression free, but there are no rules, just the ones you create for yourself.


I started a glue book some time ago, there isn't much in it, but I thoroughly enjoyed my free expression for this RAQ. So often I am designing for DT samples which confines me to specific themes or rules. Here there weren't any, other than I wanted to have some fun and try something different to my normal style.

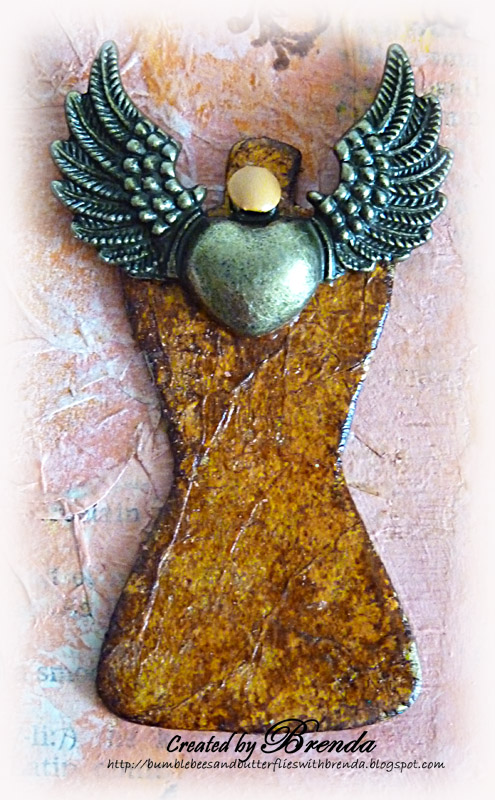
My favourite artist for experimenting with collage effects is Claudine Hellmuth (I did her creative collage course last year), so I thought I would do some "Beyond the Expected" techniques from her book (same name). Creating Poppets as she calls them.


This is me playing and just having fun. Nothing like Claudine's Poppets really, but even so I have had to think about form, shape, colour, perspective and some journalling using the actual pages from my Glue Book itself - see a wondrous novel indeed.


The journalling reads - 'Luckily the Uphams sent her out into the garden and there sat the poor thing all alone in the arbour. I spoke to her over the fence. She is such a delicate child, poor Amy.' The words and phrases were all chosen from the text of the book before I painted the pages with gesso and then acrylic paint.

Do you use a glue book? What have you been 'playing' and experimenting with lately? Do pop over to Unruly PaperArts and see how your work could be featured on the blogozine.

If you haven't seen my exciting news please pop two posts back to see how lucky I am to be part of a new design team. Woo hoo, excitement or what?

Have creative fun.

hugs {brenda} xox

Photobucket

Challenges for a change

Lots to show you today, this is post 1 and a tag I made just for me. Of course it has a dress form and a kinda sewing theme, but then it would wouldn't it????


It is ages since I entered any challenges, so I thought I would do something for just that purpose today and I chose Frilly and Funkie - now how could I resist that one lol; Simon Says Stamp and Show - Summer distress colours and Rogue Redhead Designs - use a circle, square and rectangle.

The tag was stamped with embossing ink which resists the summer distress colours that I blended over the top. I added a square of circles (does that make sense?) and rectangles of tissue paper which I blended with the DIs, the chicken wire and a piece of netting beneath it are also rectangular. To those I added a Crafty Individuals dress form (plate CI-306), also stamped with embossing ink and again the DIs blended over.


Other bits and pieces finish it off. I would like to thank dear Terry for the fibre card and tiny cotton reel as they were in a package of goodies she gave me when I visited her a few weeks ago. Thanks Terry, all my lovely bits are now in my 'sewing' box.

If you haven't seen my exciting news, then please scroll down to the last post. I am still in shock and can't believe my luck.

Wishing you happy times this weekend. Post 2 coming up soon.

hugs {brenda} xox

Photobucket

Friday, 31 August 2012

My News - Crafty Individuals - Altered Frame

Hi Everyone, I have some amazing news today, Jean at Crafty Individuals has asked me to be on her design team. You can imagine how excited I was when I received the email and of course I said 'yes' straight away, what an honour and how fabulous to be working with such a brilliant, versatile and vintage range of stamps. I have collected a number of their stamps together and I hope to be using some new ones to the range soon as well.


So this is my first piece to introduce myself to the team and the blog. I chose to use some images from the ephemera sheets and make this textured, altered frame. I would love it if you popped over to the CI Blog to leave me a message there.

I began by giving this paper substrate triple frame a coat of household undercoat paint and once dry I used a range of cream, beige and blue paints, applying them with different utensils and stippling with a brush to get a textured feel to it. Into the paint I added some torn tissue tape and torn pieces of paper - just cheap copy paper blended with some PanPastels then stamped with CI 161 text, CI 308 and CI 307 ticket stamps. This also was used for the frame backing papers. After that I mixed white acrylic and rock candy crackle paint and stippled over in various places to get more texture.


The CI 'Life's Journey 1' images were adhered to brown painted mini canvases with some stamping, lace and buttons.


The sides and insides of the frames were covered with tissue tape and the bookplate, banner and other embellishments finish it off.


Thanks for looking today. I look forward to showing you more pieces using those fabulous Crafty Individuals stamps and products that can be found at the on-line store.

Have yourself a creative day.

hugs {brenda} xox

Thought I would look for a few challenges this fits -
Out of a Hat Creations - Favourite technique or product (This includes several favourite techniques and of course my most fave products at the moment are from Crafty Individuals) Good one girls.

Simon Says Stamp - Anything Goes

Everybody Art Challenge - Anything Goes

Try it on Tuesday - Travel

The Shabby Tea Room - Summer Cottage


Photobucket

Thursday, 30 August 2012

Designs by Ryn - Fish tag

Quite a while before my holiday I had an email from Ryn asking me if I would make some samples using her stamps and once I had seen her designs I couldn't resist, especially these fishy ones.


I made some background card using paints, die-cut a tag and stamped the school of fish over it using stormy sky DI. 


Some others were cut out and added for dimension. The Koi were stamped in black archival over alcohol inked mirri board and cut out. They were edged with a black Sharpie pen to give them a clear outline and definition.


These are beautifully drawn stamps with a fabulous sketched effect and they are very deeply etched to produce excellent stamped results. Do go over and take a look at what Ryn designs and sells. She is also on Facebook here.

Stamps I used -


Let me know if you have any stamps by Ryn and what you make/made.

hugs {brenda} xox


Photobucket

Wednesday, 29 August 2012

WOYWW and Holiday photos

Well I am back to reality and a touch of normality especially with all the rain we are having today, so different to the extremely hot weather we had in California and Nevada, in fact it got to 114F or 45C at Pirates Cove near Needles on the Colorado River. That was the hottest I think I have ever been!!

So today I thought I would take my first venture into the WOYWW and show a peek of something I am currently working on, but not much of it mind, really only the embellishments I am going to use on it. The project is for something very exciting that I can reveal very soon. If you are already a WOYWWer then thanks for visiting me, if not go take a peek at all the wonderful workspaces and creations out there, hosted by Julia at Stamping Ground.


Well as I am writing this Blogger has decided it won't let me access any photos, so I shall finish the writing and come back to it later - what a bind. (OK I finally got these in by changing from Chrome to IE, don't know what is happening, but I am not the only one experiencing problems.)

The holiday photos I want to share with you are those of dear Terry and myself when Ken and I went and met up with her and Steve in Valencia.


We went for a lovely meal at BJs and as Lucy and Marjie might say I got corrupted with trying a Margarrita, actually the truth be knbown, it was my suggestion and I thoroughly enjoyed a lunchtime drink.

We then visited Michaels, because I said I had never been to one before.


Then Terry took us to Scrapbooking Made Simple, a super little scrapbook store not too far away.


The photos show us shopping and deciding on what to buy.


Needless to say I came away having spent a small fortune on bits and pieces and dear Terry bought me the Prismacolour pencils I wanted. She really is such a lovely lady and I feel so honoured to call her a friend. One day we will meet again, I hope she might come over here but that would be difficult with her dog and birds. So until my next trip to CA.


Have a great week everyone. Thanks for stopping by to see me today.
hugs {brenda} xox


Photobucket

Sunday, 26 August 2012

PanPastel UK - Earth, Wind or Fire

I have chosen earth as the element to use for my DT piece this week and made a small standing easel.


The background was spritzed and dipped with distress inks then masked over using distress embossing ink and PanPastels. Once sprayed with spray and shine I added iridescent paste through the mask just for the grass area, sprinkled some PP shavings on whilst still wet and then gently rubbed them to blend them when they were dry. 


To finish I added the downloaded butterflies and the TH frame at the back.


I nearly made a triptych to include wind and fire, but ran out of time. Looking forward to seeing what you have made using one or more of the elements of this challenge at PanPastel UK this week and don't forget the lucky winner receives a fabulous full size sample set of Pans from our sponsor 

Happy Sunday everyone.

hugs {brenda} xox


Photobucket

Friday, 24 August 2012

Stamp Man - Alter It

The day I painted this the sun had come out after all those weeks of rain in June and July so I chose a happy, summery colour theme to work with.


Recipe -
1. Paint box all over and let dry.
2. Stamp images onto tissue paper and tear them out..
3. Tear dictionary pages
4. Modge Podge the images, dictionary text and plain tissue paper over the lid.
5. When dry add more paints around all of these.
6. Stamp flourish around the edges.
7. Glue die cut around the base of the box.
8. Sand corners and edges and add Vintage Photo DI.
Finish by adding embellishments.


Supplies -
Dictionary text
Gold mirri board
Sizzix swirly strip die

If you are altering anything over the next fortnight then do link it to The Stamp Man, you never know you might be the winner of a £10 voucher to the Stamp Man on-line store.

Happy crafting.

hugs {brenda} xox

Friday evening update -
I altered this box and scheduled the post because I have been away on holiday - photos will be coming -
and I have just got back this afternoon. Suffice to say, I took this with me and it now has a new home at Terry's place in California, where she blogged about it a couple of weeks ago when I met up with her - more on that too to come over the weekend.


Photobucket

Wednesday, 22 August 2012

Love sewing themes

Markers and PanPastels


Had a play with some new markers, PPs and those fabulous PaperArtsy stamps to create this little card. The background is my own digitally designed paper using elements from DigitalCrea.


The dress form was coloured with the markers and I used a blender to create the mottled effect which gives it a fabulous vintage feel to it. As I had stamped onto cream card I used PPs to colour in the bottom half. 


Again the markers were used on the cotton reels and I finished them off with a Sakura glaze pen to make the colours stand out a bit more.

A simple card but I think it looks quite effective.

Hope you are having a good week.

hugs {brenda} xox


Photobucket

Sunday, 19 August 2012

PanPastel UK - Add decoupage

This theme had me stumped for a while as I could think of two ways to add decoupage, the layering of images where you buy decopage sheets or the art of decorating an object by gluing papers onto it often with special paint effects or gold leaf.  So I decided to make my own coloured and patterned tissue paper to cover a photo frame and this is what I came up with.


Here is the tissue which was covered lightly all over with PanPastels and then I stamped with Archivla ink over the top.


Using decopatch glue and strips torn from the tissue I covered it and then made the background paper and added the dress form, clock and other embellishments.


This is the background paper before it had the PaperArtsy mini stamped on it.


Come join us at the PanPastel UK challenge this week and you could be in with a chance of winning a set of pans from Your Creativity Store.

Happy Sunday.

hugs {brenda} xox

Photobucket