Monday, 21 May 2018

Same but Different

I'm starting the new theme for this week over on the Tando Creative blog with the title 'Same but Different'. To see more details and photos please pop over to take a peek at how I used this kit to create a telephone wall hanging.


Stay inspired.

hugs


Updated - copied over from the Tando Blog

This week on our blog we have a 'Same but Different' week where those of us taking part receive the same products to use and then at the end of the week you can look back to see how similar or different the finished pieces are. I have added a vintage telephone die-cut and a larger media board to mix it up a bit.

This is the little phone dial kit we received.


Process steps

- Take the telephone die-cut, paint it with black gesso to seal it and when dry give it a coat of black embossing powder, flicking some of it off before heating it. Give it a quin gold mixed with titan buff wash of paint and dry it. Repeat the last two steps again bit with clear ultra thick EP and quin gold on its own. When cool rub over with a coffee archival ink pad and then give a coat of ultra mate varnish.


- Take the large media board and glue some strips of greyboard to it (I cut these myself from a left over piece). Paint over a coat of white gesso - dry - rub over some candle wax and then a coat of Titan Buff media fluid acrylic. Heat dry and rub over with dry kitchen towel to remove some of the paint. Repeat the wax rubbing and paint a coat of light grey media acrylic. Again dry and rub paint away.   Finish by sanding some edges and blending in ground espresso distress inks.


- Take the dial and cover with black gesso, when dry rub over a thin layer of silver metallic lustre. Lightly sand back some random parts on the edges and blend over ground espresso distress ink. Distress the clock face with the distress ink, seal with matte medium and assemble the dial pieces.


- Take the smaller media board and cover it with a piece of patterned paper. I used one that was already looking distressed. Sand the edges and blend brow distress ink around the edges.


- Take the label, paint it with burnt umber and sand some of the edges when dry. Blend round brown distress ink and then mount it on white paper so that the words stand out.


Assemble the pieces adding smaller details here I cut up some words from remnant rubs to create my area code ........


... and I added some rusty painted gems and little circles from nuts and bolts kits.


Finally hang with some rusty wire.

Friday, 18 May 2018

Follow In My Footsteps - Wishful

Using the last of the backgrounds for this mini series 1, this panel came about really quite simply. By choosing the small ephemera card of the Boston store to work with I just searched my left overs, kept in small boxes, to fit a green theme and this is what I came up with.


I wonder what the story is of this young woman? Does she work in the store and restock the shelves or is it one of her favourite stores to visit? Perhaps she went in recently and bought something for 23 shillings.


If you haven't seen the previous three in the series they are Soulful, Thoughtful and Determined.


The steps to follow for creating the background can be found by visiting a Vintage Collage Tag, created in July 2017.

Supplies I used -
DecoArt Chalky Finish paints in relic, lace, rustic, revive, raw umber, burnt umber and quinacridone gold.
Tinting Base
Text stamp
Collage ephemera


Wednesday, 16 May 2018

Follow In My Footsteps - Thoughtful

I am so enjoying making these small collages with backgrounds made by following the steps of a previous project I am particularly happy with.  I want to make more use of my own creative processes.


 This is the third in this mini series and the original post from which I re-created the steps is HERE.


The steps to follow can be found by visiting a Vintage Collage Tag, created in July 2017.

Supplies
DecoArt Chalky Finish paints in relic, lace, rustic, revive, raw umber, burnt umber and quinacridone gold.
Tinting Base
Text stamp
Collage ephemera

Last week's panel was called Soulful and is one I am definitely keeping but this might be given away next weekend at Ministry of Mixology. I'll see how I feel about it lol.

Thank you for sharing my creative journey with me.

“Those who do not want to imitate anything, produce nothing.” 


Find time to create or enjoy some art sometime soon.


Sunday, 13 May 2018

Faux encaustic media board - DecoArt Media Team

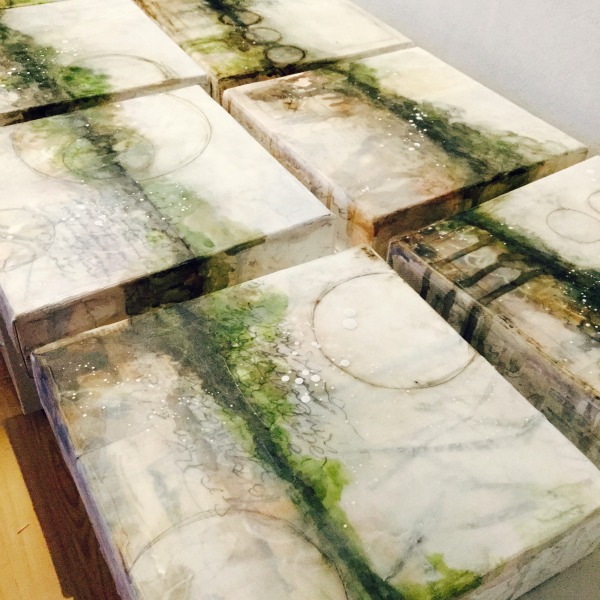
I was over on the DecoArt Media Blog recently with a project that I am very excited about. I found an artist on the internet called Laly Mille and totally fell in love with her work. I had been researching what was out there in terms of how to create a faux encaustic look. I so loved her little canvases and her short explanation video, I followed the brief explanation of her steps and created my own version. 


I approached Laly about whether I could share this and use it for my DecoArt Media Team project and she was very happy to let me. Here are her little canvases that sparked my interest and imagination.
You can find her website here , her blog here and her free videos here.


I fell in love with Laly's work and she teaches classes on line so I have signed up for one. It starts soon. You can find her class list here.

If you try this technique I hope you have as much success as I did.

Stay inspired.


Monday, 7 May 2018

Using an embossing folder mixed media style


I'm up on the Tando Creative blog today and this week the theme is 'embossing folders'.
I keep some offcuts of embossed card and thought I would experiment  with creating some random textures on a media board. Andy got me onto this when he did something similar on a project many years ago but I've taken it and changed it quite a lot.


A great distressed background using combined with rusty elements looks fab. I hope you can pop over to see the process steps.

Thanks for stopping by.

hugs Brenda xxx


Updated from the Tando Blog

I thought I would create a textured media board for embossing folder week and I liked it so much I decided it would become my 'Make and Take' project at Ministry of Mixology last month. (I was well ahead of myself with projects as I had a holiday coming up and wanted to get loads of projects scheduled well before hand).


I adhered a few pieces of torn/cut left over embossed card randomly onto a media board using matte medium and left it to dry between wax paper under a heavy box.


Don't worry about gluing the pieces over the edges, you can remove these when it's perfectly dry.


Next I scraped over some texture sand paste and heat dried it.


Paint a coat of white gesso to give it some tooth for the next layers and then spend quite some time spritzing water, dipping media acrylic paints into it, letting it move around a little and drying it. I repeated this step lots and lots of times using raw umber, quinacridone gold, burnt sienna and carbon black.


I wanted to highlight the textures a little more so I took a palette knife and white gesso and lightly scraped it over keeping the blade flat to the surface.


The White gesso is very stark so mix a dirty watery wash of paynes grey and quin gold and paint over the whole surface, dry it and seal with a varnish - I used soft touch.


I took some elements I had already rusted and a word (I have no idea why I chose the word 'waiting' although there is something special we are waiting for later in the year - that's my unconscious mind taking over perhaps!) and I put it together to finish it off. I'm really happy with this.


The textures from the embossed card are random and give a completely distressed look to the background.


Friday, 4 May 2018

Words and Music for AVJ

The lovely Alison has chosen a fabulous theme for this month and I thoroughly loved thinking through how I could depict it in a project. Here goes ........ her brief was clear -

'For this challenge we would love to see projects that are inspired by our favourite song or that incorporate musical lyrics or sheet music in their design. Just remember to create your project in our preferred styles of vintage, shabby, mixed media, art journaling, industrial, timeworn or steampunk'.


I took one of my special cut media boards from tando Creative and sealed one side with white gesso and then adhered some music paper, words and stencilled letters. I chose the music paper carefully and typed out the words I wanted to use at the end as a sentiment. Do you recognise it?

Softly, deftly
Music shall possess you.
Hear it, feel it,
Secretly possess you.


I cut off the excess around the edges and then took some white gesso and a palette knife and scraped some across he board and round the edges, sealing it with matte medium when it was dry.


Next I spritzed the background with water in a small area so I could control the colouring up of this next layer and dabbled in a little paynes grey. In the opposite corner I did the same with quinacridone gold and across the middle with burnt umber. I didn't tilt the board to let the colours merge I just heat dried and then repeated the process with the colours swapping them to different areas.


I repeated those two gesso and paint steps again ....


.... and then gathered some collage pieces to finish off the board - old music scores and the words from Phantom of the Opera (one of my most favourite musicals - see above).


Once I had stuck everything down and gone in with a charcoal pencil to add some shading and depth I was quite pleased with the look. I said this year I would be going back to using more neutral and vintage colours again and it is certainly making me happy.


I hope you will enjoy looking at all the wonderful and inspiring projects from the team at A Vintage Journey for our Words and Music challenge and maybe you will find a little time to join in and share something you have been making.

Have a creative month.

hugs Brenda xxx

Monday, 30 April 2018

Small Journal Panel - Shabby Vintage

I have a small panel to share today with my favourite vintage mixed media vibe to it.


Process steps
1. Cut patterned paper slightly smaller than backing card, distress the edges with a distressing tool.
2.Add a strip of tissue tape.
3. Apply white gesso through a small stencil with a paint brush. Dry
4. Seal the substrate with matte medium. Dry
5. Dip into washes of raw umber and quinacridone gold. Dry
6. Roughen the edges more and blend in ground espresso distress ink.
7. Adhere the substrate to a piece of backing card (mine is 8 x 11 cms).
8. Gather and distress your collage elements and your vintage photo and adhere to the background.
9. Cover the face with scrap paper and splatter some watery tinting base or white gesso / paint.
10. Use a chit-chat sticker or your own printed sentient to finish.


I used up some of my scrap bits and as well as o downloaded photo just sitting in a box waiting to put on show.

Add caption


Thursday, 26 April 2018

Use patterned paper for Tando Creative

I have a project over on the Tando blog today where the theme is to use patterned paper. Can you see or guess where I used mine?


For all the details please pop over to the Tando blog where I show you the process steps in full colour.

Thanks for stopping by.

hugs Brenda xxx

Monday, 23 April 2018

No Spring colours - tag

I have a tag over at Country View Crafts Project Blog today and there are no bright Spring colours as I had already started and knew I wanted neutrals ...... 


.... but when the words of 'Spring' appeared when I added some old dictionary paper - I couldn't ignore them.


I still think it all fits together. If you go over to CVC you will see the process steps and more photos and make your own mind up.

Enjoy whatever you have planned this week.

hugs Brenda xxx


Friday, 20 April 2018

Follow In My Footsteps - Determined

I loved using the same background for the four small panels I am sharing in this first mini series of 'Follow In My Footsteps'. Rather than make a masterboard and cut it up I cut the panels and did exactly the same steps on each one, hence the similarities in them.


 All the collage elements were pieces on my desk are from small boxes of oddments I keep for such projects. In fact the left panel under the photo is an old book spine of a book called The Antiquary by Sir Walter Scott. The book has been altered and used and I couldn't bear to throw the cover and spine away even though it was very tattered.


If you haven't seen the previous two in the series they are Soulful and Thoughtful.


The steps to follow can be found by visiting a Vintage Collage Tag, created in July 2017.

Supplies
DecoArt Chalky Finish paints in relic, lace, rustic, revive, raw umber, burnt umber and quinacridone gold.
Tinting Base
Text stamp
Collage ephemera